Windows 8 Explorer

One of the new features of Windows 8 is new Windows Explorer. Yes there are other new things in Windows 8 like new Task Manager, new Windows 8 Start Menu and other stuff which can be explored from the Control Panel. This post provides an insight and screenshots of the new Windows 8 Explorer. We all use Explorer for various purposes including managing files, folders, network connections and lots of other stuff. Just like in older versions of Microsoft Windows, you can launch Windows 8 Explorer from command line by running explorer.exe.

Windows 8 Explorer provides Hard Disk Options

Windows 8 Explorer provides Hard Disk Options


As displayed in the above screenshot Windows 8 Explorer has a new user interface termed as ribbon interface and it changes it’s options depending on the file, folder or drive selected. In the above screenshot the C Drive is selected in Windows Explorer and related commands like Properties, Open, Rename, etc options are displayed. The top ribbon bar of Windows Explorer changes automatically as is evident from the given below screenshot as well.

Windows 8 Explorer provides Compression Folder Tools

Windows 8 Explorer provides Compression Folder Tools

In the above screenshot Windows 8 Explorer displays available options for Compressed Folder or .zip files. Windows 8 Explorer indicates available command category displayed with colored rectangular patch in the title bar of the Windows 8 Explorer Title Bar. The available commands displays icons along with description of every command available in the ribbon bar of Windows 8 Explorer.

Windows 8 Explorer provides Video Tools

Windows 8 Explorer provides Video Tools

As you can see in the above screenshot Windows 8 Explorer is displaying icons available under Video Tools category as some video file has been selected in the Explorer Window. Windows 8 Explorer adapts itself automatically depending on what file(s) are selected and as per Microsoft it displays more file / folder icons for the same monitor resolution. In case you have still not tried Windows 8, find out some more stuff about Windows 8 on this website and decide for yourself whether to upgrade to Windows 8 or keep on using your current Windows Operating System.
How to Delete the Application History in Windows 8

This post explains how to delete the Application History in Windows 8 operating system on your PC. Whenever you close the Windows 8 Style Application in Microsoft Windows 8, on rare occasions it happens that it gets paused instead of closing completely. This enables you to switch between applications instead of launching an application from the start. The steps given below explains you how to go ahead and delete the Application history in Windows 8.

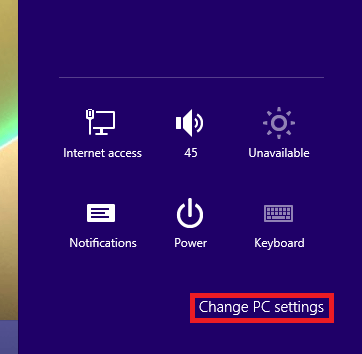
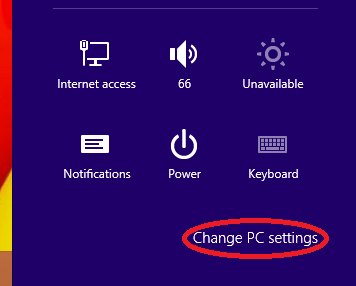
1) Open the “Setting Panel”. You can do this by using the combination of Windows key with “I” key i.e Windows+I. A side bar appears on the right side of your screen( Setting Panel). Click on the “Change PC settings” button displayed at the bottom of the “Settings Panel”.

Settings Panel in Windows 8

Settings Panel in Windows 8

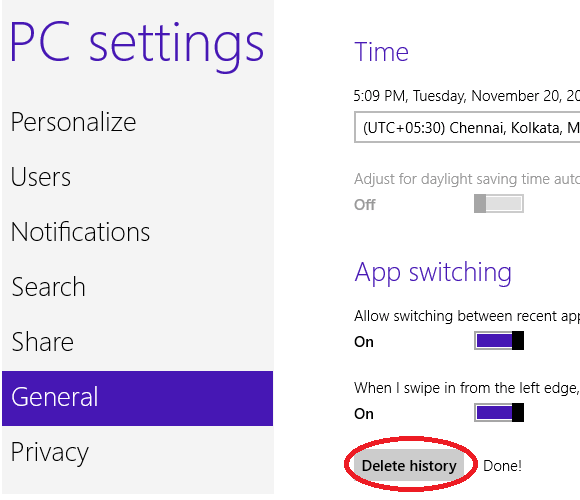
2) After selecting “Change PC settings”, the screen will switch to PC Settings Panel. Click on “General” from the list of option in PC settings panel. When you select “General”, on the right hand side you will be able to see different options. Under “App switching”, you will be able to see “Delete History” button marked in red circle as shown in the Screenshot below. Click on “Delete History” button.

How to Delete Application History in Windows 8

How to Delete Application History in Windows 8

3) After you click on “Delete History” button, you will see a Confirmation saying “Done” next to it as you can see in the Screenshot given above. This is all about it. You can also follow the procedure in this post to access the “General” category of “PC settings panel” which is used to “View the Used Space by Windows 8 Applications” that we have posted previously.

How to Make Everything Bigger on Your Screen in Windows 8

Today we are going to discuss about a very interesting feature in Windows 8. Its about making everything on your screen look Bigger to meet your interest of vision while you operate on Windows 8 system. All you need to do is just follow the simple and easy Steps given below.

1) Switch to the Windows “Setting Panel” by either Holding down the Windows key and pressing “I” key i.e Windows+I or by moving your cursor to top or bottom right of your Windows 8 screen and selecting “Settings” from the Charm Menu that appears. This method will open the “Settings Panel”. Select “Change PC settings” that will be displayed at the bottom of the Settings Panel.

Settings Panel in Windows 8

Settings Panel in Windows 8

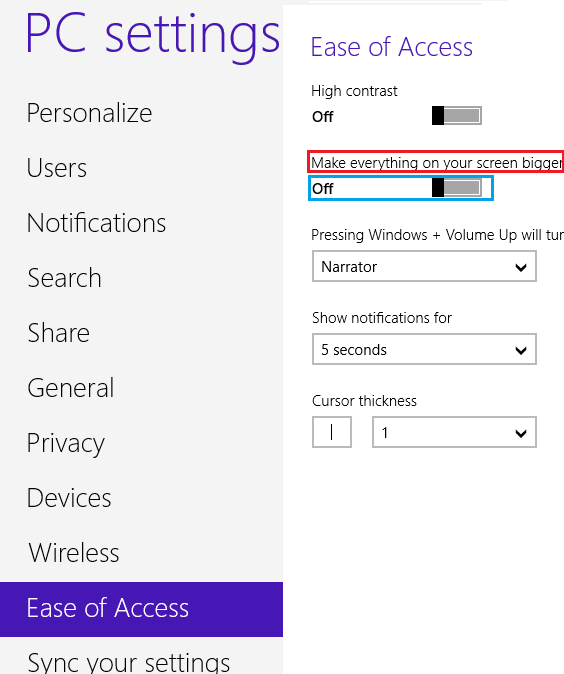
2) After you click on “Change PC settings”, the screen will head over to PC settings panel. Click on “Ease Of Access” from the list of options in the PC settings panel. When you select  the “Ease Of Access”, on the right hand side it displays various options one of which is “Make everything on your screen bigger” and an “OFF” option under it followed by a slider as shown in the Screenshot given below.

How to make Screen Bigger in Windows 8

How to make Screen Bigger in Windows 8

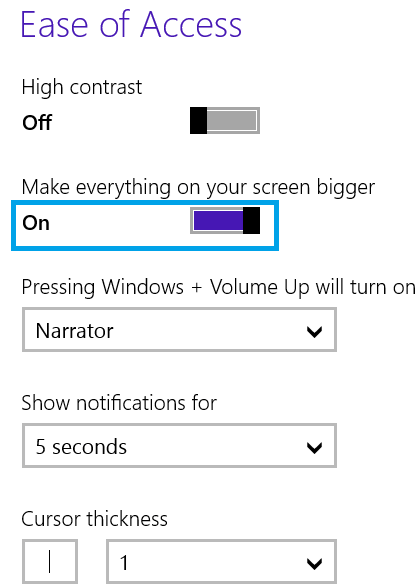
3) Move the slider to the right to activate it as shown in the Screenshot given below and the it Turns “On” making everything on the screen look Bigger in size and that’s it. The slider is basically for switching between the ‘OFF and ON” modes.

ON Mode to make Screen Bigger in Windows 8

ON Mode to make Screen Bigger in Windows 8

4) This is basically all about Making the Screen bigger in Windows 8. If you ever wish to go back to the normal mode, all you need to do is switch the slider back to the Left hand side. You can also have a look at our previous post about “How to make the Title bar Bigger or Smaller in Windows 8“.

How to Enable Delete Confirmation Dialogue Box in Windows 8

If you are new to Windows 8 and find yourself sending the files directly into the Recycle Bin by mistake when you press delete button on the keyboard or selecting delete option from the Right click drop down, then its probably because Microsoft has Disabled the Delete Confirmation Dialogue by default. This post will guide you Enable the Delete Confirmation Dialogue box if you are finding inconvenience of files being sent directly to the Recycle Bin. Given below are the simple and easy Steps to Enable the the Delete Confirmation Dialogue.

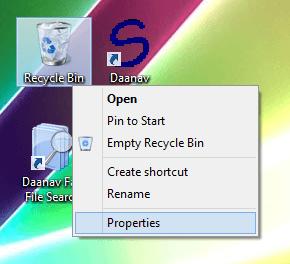
1) Right Click on the Recycle Bin on your Desktop. You can Switch to your Desktop Screen directly by holding down the Windows key and Pressing “D” key i.e Windows+D. After you right click on the Recycle Bin, a drop down appears. Select “Properties” from the drop down as shown in the screenshot below.

Right Click on the Recycle Bin in Windows 8

Right Click on the Recycle Bin in Windows 8

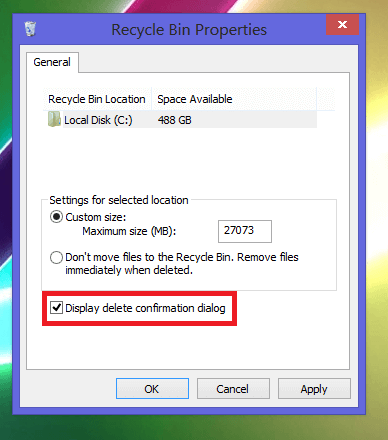
2) When you click on the Properties Option from the drop down, a window opens i.e the “Recycle Bin Properties”  window. On the bottom of the window, you will be able to see an option where it says “Display delete confirmation dialogue” with a check box option next to it.  Click on the check box as shown in the Screenshot below.

Recycle Bin Properties Window in Windows 8

Recycle Bin Properties Window in Windows 8

3) Once you have clicked on the check box next to “Display delete confirmation dialogue” option, click on Apply and OK. This will enable the Delete Confirmation Dialogue and it will appear on your screen the next time you try to move any file to Recycle Bin. Given below is the Screenshot of the Delete Confirmation Dialogue.

Delete Confirmation Dialogue In Windows 8

Delete Confirmation Dialogue In Windows 8

4) Click on “Yes” to move files to recycle Bin or “No” to cancel the action.This is all about it. You can also delete the files permanently from your Windows 8 system by selecting the files and Holding down the Shift key and pressing delete key i.e SHIFT+DELETE. This method will give you a Delete Confirmation dialogue by default.

How to Disable the Lock Screen in Windows 8

The Lock Screen in Windows 8 is an interesting new feature. This post will guide you how to configure the display properties of Lock Screen in Windows 8 on your PC or Laptop. All you need to do is, follow the simple steps given below that will help you to change the configuration of the Lock Screen properties.

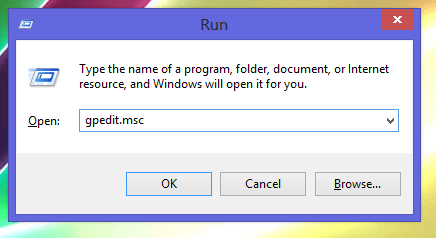
1) The first thing you need to do is Open the Run Box. You can do this by holding down the Windows Key and pressing the letter “R” i.e Windows+R. this will pop-up the Run Box window on your screen. After this you need to type in “gpedit.msc” in the Run Box as shown in the Screenshot given below. Click on OK or Hit Enter on your Keyboard.

Run Box in Windows 8

Run Box in Windows 8

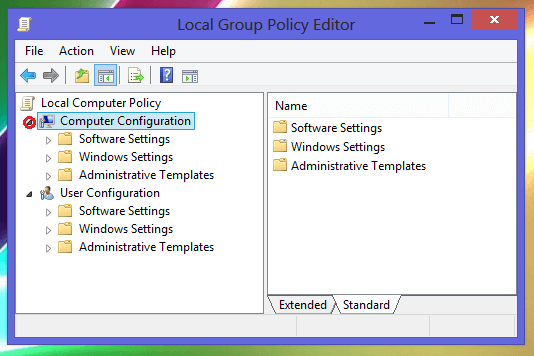
2) When you click on OK or hit Enter, it will open the “Local Group Policy Editor” window on your screen. On the left hand side of this Window you will be able to see “Computer Configuration”. You can click on the small triangular button next to it which will open or close the drop down of “Computer Configuration”. This Drop down shows the folders and sub-folders in that particular category. Below is the Screenshot of how the “Local Group Policy Editor” window and the triangular button marked in Red Circle next to “Computer Configuration” looks like.

Local Group Policy Editor Window in Windows 8

Local Group Policy Editor Window in Windows 8

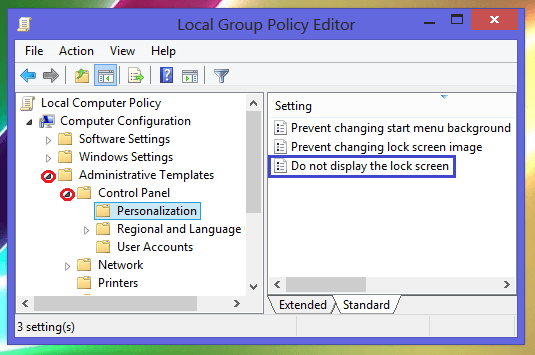
3) After you open the sub-folders of “Computer Configuration” by clicking the triangular button, then click on the triangular button of the folder named “Administrative Templates”. This will opens its sub category in which you will find a folder named “Control Panel”. Now open the sub category of the “Control Panel” folder in the same way mentioned above. Under “control Panel” you will be able to see a folder named “Personalization”. Click on it. The Screenshot below shows the eventual openings of the folders and sub-folders.

Personalization Folder in Local Group Policy Editor Window in Windows 8

Personalization Folder in Local Group Policy Editor Window in Windows 8

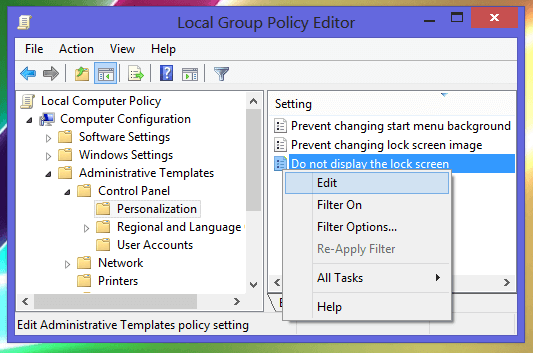
4) After you click on the “Personalization”, on the Right Hand Side you will be able to see  different options under the Settings. One of which is the “Do not display the lock screen” option as shown in the screenshot above marked in blue. Double click on the option or Right click on it and select Edit from the drop down as shown in the screenshot below.

How to disable lock screen in Windows 8

How to disable lock screen in Windows 8

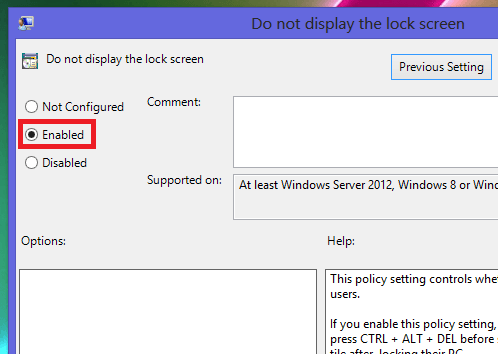
5) When you do the above step, a “Do not display the lock screen” window opens up on your screen with its configuration settings. On the left hand side of this window, you will be able to see different options like Not Configured, Enabled and Disabled. There are options as well like Comments, Previous Setting and Next setting.

How to disable the lock screen in Windows 8

How to disable the lock screen in Windows 8

6) Click on the “Enabled” button and then Click on Apply and OK. After you do so your Lock Screen gets disabled and you are done. Follow the same steps for Enabling the Lock Screen by clicking on the Disabled Button or keeping it non-configured by clicking the Not Configured Button.