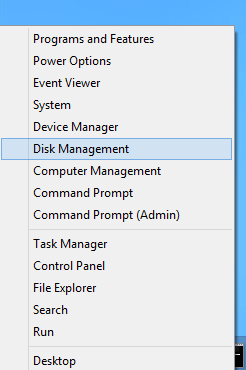
Windows 8 provides easy to use Hard Disk Management Features with which you can easily reduce the size of your Hard Disk, Change Device Letters and do other type of Disk Management. There are multiple ways in which you can launch the Disk Management console in Windows 8 including Control Panel, Windows 8 Quick Menu, Desktop Shortcut, etc. The given below screenshot displays Windows 8 Shortcut Menu to launch the Disk Management Console of Windows 8. Yes you would need Admin Access to your Windows 8 Computer in order to do reduce the size of Hard Disk.

Launch Disk Management from Windows 8
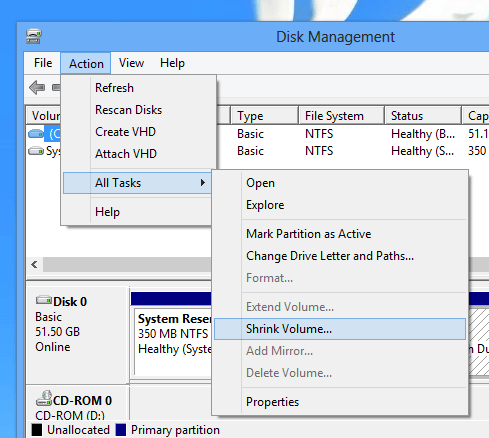
Once you have launched the Disk Management of Windows 8, everything else is really easy to do. Windows 8 automatically evaluates the Hard Disk Size available and computes other technical bits and bytes when you instruct it to Shrink the Disk or Drive. This Disk Management Console can also be helpful to format and manage any un-partioned disk partitions or drives. The given below screenshot displays how you can launch the Shrink Disk Size option or you can simply right click on the disk whose size you wish to reduce.

Launch Shrink Drive Action from the Windows 8 Disk Management
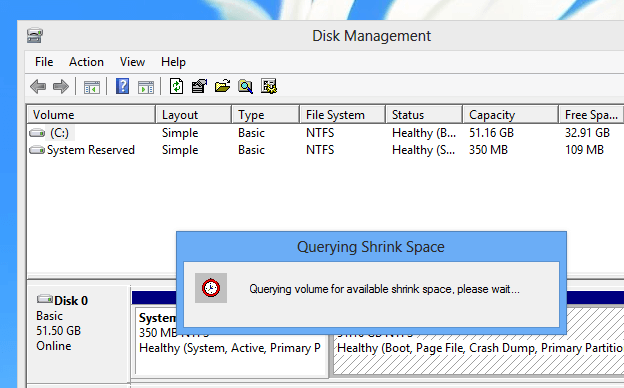
As you can see from the above screenshot, there are other Actions available for the selected drive apart from shrinking the disk or volume. Other Actions will automatically enable or disable depending on what disk or partition you choose. Make sure that you do understand what you are doing before actually doing any of the hard disk changes. In case you are not sure run Windows 8 on a Virtual Computer and do experiment with it before actually changing your actual Window 8 installation. The given below screenshot displays Windows 8 Disk Management Console querying volume for available shrink space.

Shrink Hard Disk Space on Windows 8
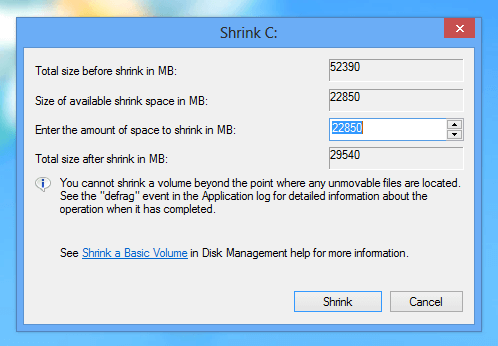
Time taken for Querying of Volume will depend on our selected drive / partition and once done, a popup window will appear asking you to confirm the number of Mega Bytes by which you wish to shrink the disk size. The popup Window will indicate the Volume Name you are about to shrink / reduce and will also tell you the new size of the selected drive or partition.

Specify Shrinked Hard Disk Size on Windows 8
Reducing the size of any Disk or Drive is really easy in Windows 8 and can be helpful when you wish to have separate partitions for separate purpose. With Windows 8, you do not need to pay for any Hard Disk Utility providing you Volume Shrinking Capability and you do not even need to pay a technician when you can do manage your Disks and Drives of Windows 8 all by yourself so easily and quickly.