Command Prompt in Windows 8

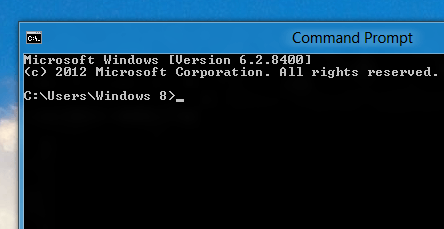
The Command Prompt in Windows 8 is the same as in older versions of Microsoft Windows. In Windows 8, the Command prompt can be run either using signed on user’s credentials or under administrator’s credentials. The given below screenshot of the Command Prompt in Windows 8 displays signed on user’s name in the folder name. Just like any other application this Windows Application can be launched in multiple ways and depending on your preferred choice, you can use any of the ways.
Command Prompt in Windows 8

Command Prompt in Windows 8

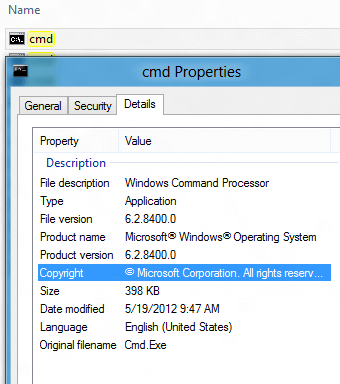
In order to launch the command prompt window, you need to locate and run the application file named cmd.exe. The Command Prompt (or Windows Command Processor) Application is typically located in the System32 folder of your Windows directory. Given below is the screenshot of the properties Window of the cmd.exe found on a Windows 8 64 bit installation.
cmd Properties on Windows 8

cmd Properties on Windows 8

The easiest way to launch Command prompt in Windows 8 is to search for it. Yes you do not need to navigate to the Windows Folder or even to the System32 folder in order to launch the command prompt in Windows 8, just press the Windows Key + Q Key on your keyboard and type in cmd to let Windows Start Menu search the Command Prompt App on your Windows 8 computer and allow you to launch it with a single mouse click as displayed in the screenshot below.

Search for Command Prompt in Windows 8

Search for Command Prompt in Windows 8

Yes there are many other ways in which you can launch the Command Prompt in Windows 8 and the Desktop Shortcut can be equally an easier way to launch the Command Prompt as outlined below. In order to create a new Desktop Shortcut, Right Click at an Empty space in Desktop and Click on Create New – >  Shortcut as displayed in the screenshot below.
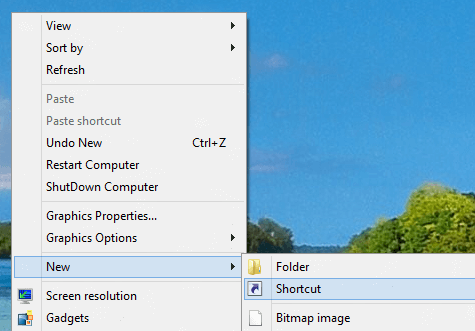
New Shortcut in Windows 8

New Shortcut in Windows 8

Once you have started the wizard to create a new Shortcut, enter cmd into the Shortcut wizard as displayed in the screenshot below and just follow on screen prompts. Once you have Desktop Shortcut created to launch the Command Prompt in Windows 8, you can launch the Command Prompt anytime using the Desktop Shortcut.
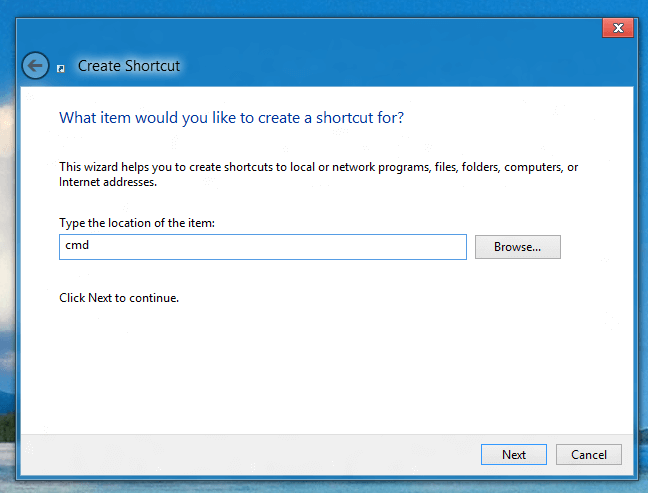
Create Shortcut to Command Prompt in Windows 8

Create Shortcut to Command Prompt in Windows 8

Just like with any other Application, you can pin the Command Prompt Shortcut to the Start Menu or even to the Taskbar. Note that there are no JumpList Shortcuts displayed by the Command Prompt Shortcut in Taskbar. In order to change the default folder of the command prompt, right click on the Command Prompt Shortcut, navigate to the Shortcut tab and change the default folder by specifying the new default folder location in the Start in field as displayed in the screenshot below.
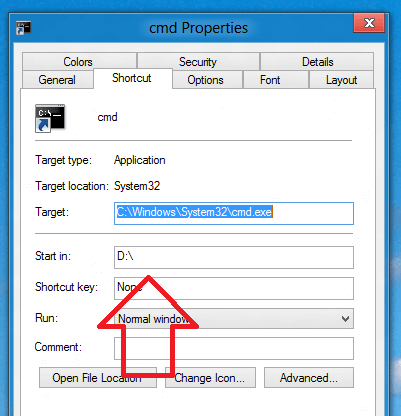
Change Default Folder of Command Prompt in Windows 8

Change Default Folder of Command Prompt in Windows 8

You can create multiple Shortcuts to Command Prompt and place them in any folder. In case you frequently need to open command prompt window in multiple folder locations, use the Shift + Right Click on any Folder to display an extra Menu Item to open a Command Prompt Window at the selected folder location.

Open Command Window in Windows 8 at Selected Folder Location

Open Command Window in Windows 8 at Selected Folder Location

In case you would like to open Command Prompt Window as an Administrator to carry out some task, that might affect all user’s of your Windows 8 Computer or to modify some system files, you would need to right click on the Command Prompt Shortcut and select the option Run as Administrator as displayed in the screenshot below.
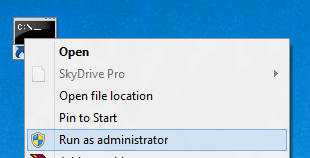
Command Prompt as Administrator in Windows 8

Command Prompt as Administrator in Windows 8

The Command Prompt in Windows 8 runs the dos commands allowing you to list files using the dir command, allows you to rename files using the ren command, allows you to delete and copy single or multiple files and much more. You can even format drives from the command prompt and just like any other application in Windows 8, this Command Prompt Application must be used with proper understanding. Although there is no JumpList for the Command Prompt Application in Windows 8, you can use function keys and Arrow Keys (Up and Down Arrow Keys to retrieve Commands run in Command Prompt) as shortcuts to retrieve old commands run in a particular command prompt window.

Windows 8 Screenshots Location

Windows 8 allows you to capture screenshots using Windows Key + Prt Scr Key on Keyboard. Once the screenshot is captured, the screenshot is stored as a .png file in Windows 8 Screenshots Folder. This post allows you to locate the Windows 8 Screenshots Folder, Change it and know more about the functionality of capturing screenshots in Windows 8. Another important thing to note about the Windows 8 Screenshot functionality is that the captured screenshot will encompass all the monitors connected in extended mode. Effectively the screenshot captured by Windows 8 with Windows Key + Prt Scr button would be of size equal to your total Virtual Desktop size in pixels.

Windows 8 Screenshots Location

Windows 8 Screenshots Location

The above screenshot displays the default Screenshots Location in Windows 8. In order to navigate to the Screenshots folder of Windows 8, simply open Windows Explorer and navigate to the Pictures Library and locate the Screenshots folder as displayed in the above screenshot. The post Screenshots in Windows 8 details the process of capturing screenshot in Windows 8 without using any 3rd party software application. This functionality has been there in Macintosh Computers for long and starting with Windows 8, Microsoft is also offering the functionality.

Properties of Windows 8 Screenshots Location

Properties of Windows 8 Screenshots Location

In order to change the Windows 8 Screenshots location, right click on the Screenshots Folder as displayed in the above screenshot and click on Properties. Once you click on the Properties Menu of the Screenshot Folders Context Menu (Right Click Menu), you need to navigate to the last tab  (The Location Tab in the Properties Window of the Screenshots Folder) of the Properties Window as displayed in the screenshot below.

Modify Screenshots Location in Windows 8

Modify Screenshots Location in Windows 8

Here in the Location tab of the Screenshots Properties, you can modify the Screenshots Location of Windows 8. In order to use another folder for storing the Screenshots captured by Windows 8 using the Windows Key + Prt Scr button, you need to Move the Screenshots folder Location of Windows 8. You can even restore the Screenshots Properties to default values using this Screenshot Properties tab.

There are multiple software applications available for Windows to help you in capturing screenshots. One of such screenshot capturing utilities is the Screen Capture Software Application which allows you to define the size of the screenshot to be captured and then allows you to capture single or multiple screenshots. When using the Windows 8 functionality of capturing screenshots on multiple monitor computers, just remember that screenshot of all your extended monitors are captured in a single image file.

Software Without Installer

There are very limited number of Software Applications without Installer. Yes there are multiple valid reasons as to why the Software Companies provide an Application Installer. In case you are wondering whether you can try out single or multiple software applications which do come with installer without actually installing them, then read on to know more about various alternatives to software installation. Yes you can check out almost all the features of any software application without actually installing them or you also install the software on a virtual computer.

Software With or Without Installer

Software With or Without Installer

So called portable applications which run without an installer limit your software selection. In case you want to check out the features of any software application without installing it on your computer, the very first resource is the software developer’s website. Visit the software developer’s website and find out whether they do publish screenshot of the software, also try to find out whether they do have any video tutorials published on their website to let users view the software features. Various Software Directories publish software applications from various software developers on their own website and it is best option to download a software from the website of software developer itself to get the latest version of the software.

Another quick way to check out software features without installing it on your computer is to use Google Images search. Search with full Application Name in Image Search to find out all the screenshots of the software and they should give you an idea about whether the software is worth downloading. Another similar way is to do a full software name search in video websites and in case you can find a working video tutorial of the software, it can really save you time and efforts to be spent in downloading, installing and learning that particular website.

Software Applications are distributed with Installer so as to provide you quick way to Install and Uninstall the Software Application. Most of the time every software application has dependency on other software components such as dll files, resource files containing images, music file, etc. The Installer takes care of storing multiple files at the selected folder, Desktop and Programs Menu Shortcuts are also created by the installer Applications and depending on the complexity of the software, the Software Installer performs other actions such as Active X Control Registration, COM Component Registration, etc. Yes there is a need for Software Installers as Software Applications are becoming complex and more sophisticated day by day.

Virtual Computer Software in Windows 8

Virtual Computer Software in Windows 8

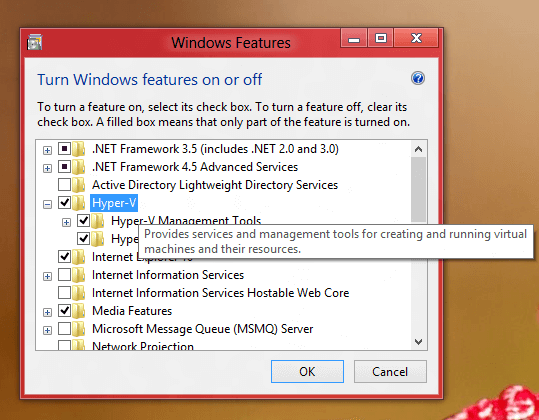
Overall best way to try out a Software Application is to download and install it on some other computer and check whether it fits your needs. In case you do not have multiple computers or computers with same operating systems, you can use Virtual Computers. One such Software is Oracle Virtual Box which allows you to run a complete operating system in a single file and the installed operating system can connect to internet, download files and do whatever you want it to do. Microsoft Windows 8 also provides similar software with the name of Hyper-V, which is a feature in Windows 8. Other versions of Microsoft can use the Virtual PC Software distributed by Microsoft Windows for free.

Windows 8 Safe Mode

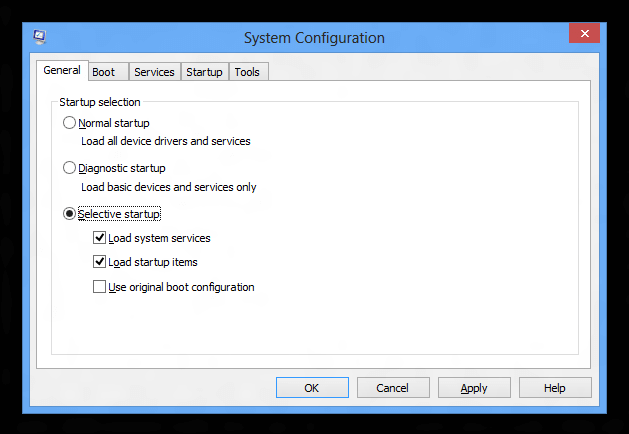
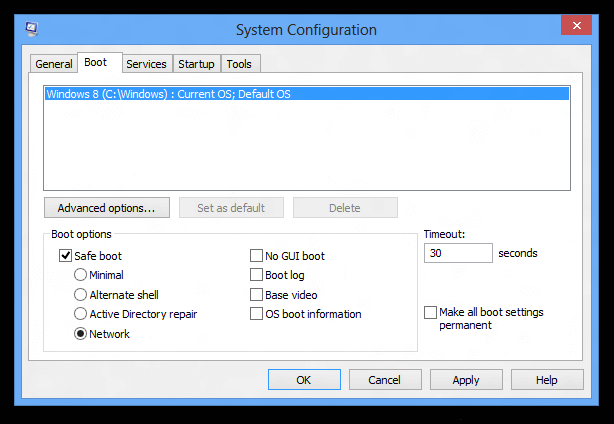
Getting Windows 8 in Safe Mode is supported by Microsoft Windows 8 in two ways. The first way to run Windows 8 in Safe Mode is by keep on pressing Shift + F8 when Windows 8 is about to Start. The only issue about this traditional way to boot Windows to Safe Mode is that it works only sometimes. Windows 8 prefers to offer automatic recovery of your Windows 8. The Safe Mode is used by Driver Developers to debug device drivers and lots of other such advanced and low level purposes. The Second way to boot Windows 8 in Safe mode is to use the msconfig utility and configure the Start-up Options so that Windows 8 boots in Safe Mode optionally with networking support.

Windows 8 Automatic Repair

Windows 8 Automatic Repair

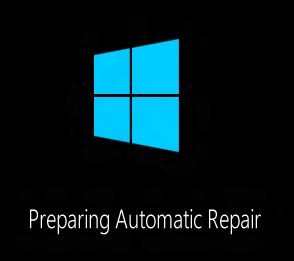
In case your Windows 8 does not bots up properly, it will automatically start the Automatic Repair functionality. Yes Windows 8 will indeed ask your permission to do any changes to the hard disk and you are supposed to carefully select the best option to recover your Windows 8 Installation. The above Windows 8 Automatic Repair screenshot has been altered a little so that it fits properly in this post which covers all aspects and alternatives to the Safe Mode debugging of Windows 8.

Windows 8 Could not Load Correctly

Windows 8 Could not Load Correctly

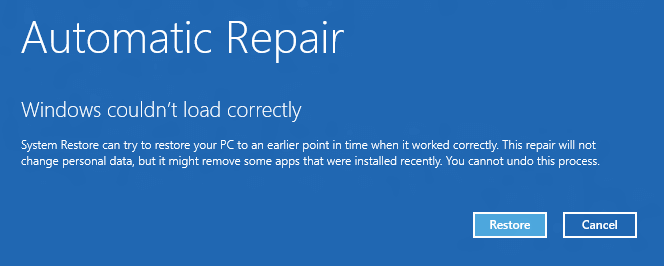
The Automatic Repair functionality of Windows 8 is the quick and fastest way of Windows 8 to get your Windows 8 Installation back on track. Depending on the reason you are looking for getting your Windows 8 installation fixed, you should try to remember what were the last changes done to your Windows 8 due to which your Windows 8 could not boot and you are looking for the traditional way to start Windows 8 into Safe Mode. The Windows 8 Automatic Repair also checks for Disk Errors automatically and hence you can simply follow the onscreen prompts and check whether you actually need to boot Windows 8 in safe mode and try to fix Windows 8 issues or let the Automatic Repair wizard find out the issues.

Automatic Repair of Windows 8 Could not Repair PC

Automatic Repair of Windows 8 Could not Repair PC

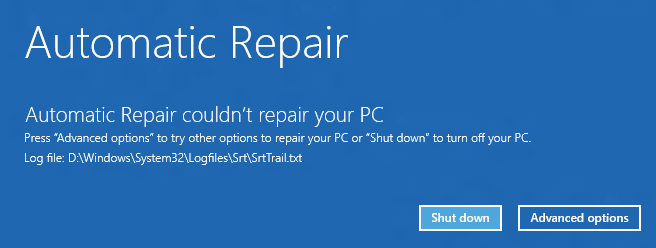
In case the Automatic Repair wizard of Windows 8 could not find any issues, it will present you the above screen and will allow you to try out the Advanced Options of PC Recovery. It also creates a log file and tells you the file path with information containing steps taken by the Automatic Repair Wizard of Windows 8.

Windows 8 Automatic Recovery Advanced Options

Windows 8 Automatic Recovery Advanced Options

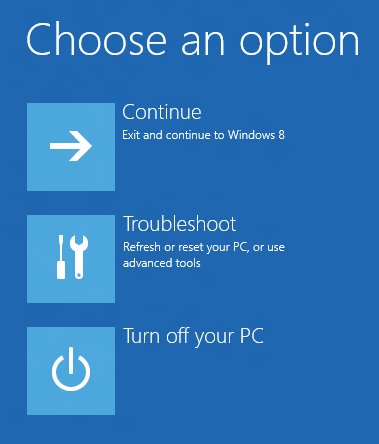
Once Automatic Repair wizard has given up, it gives you advanced options to select a way to get your Windows 8 working again. Yes this is an advanced step as it can affect what changes are going to be done to your Windows 8 computer. Do not do any changes to your Windows 8 computer, until and unless you are very much sure of what you are doing. Click on the Troubleshoot option to use advanced tools. This Trouble shoot option also provides you way to Refresh or Reset your Windows 8 Computer. The Refresh and Reset Options are new in Windows 8 and must be used only with full understanding and responsibility of the existing data in the Windows 8 computer.

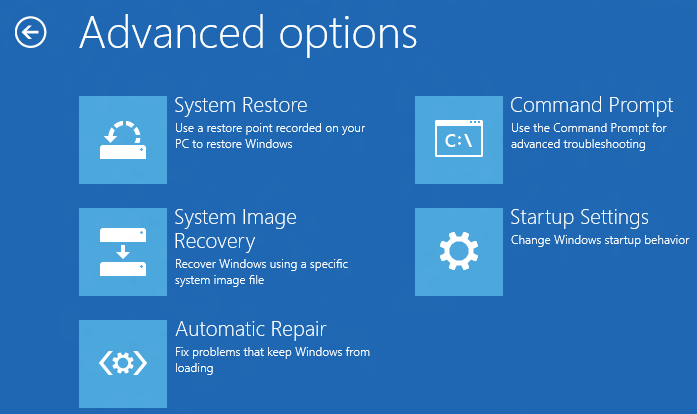
System Restore and other Advanced Options Like Safe Mode of Windows 8 Recovery

System Restore and other Advanced Options Like Safe Mode of Windows 8 Recovery

Given above screenshot displays the available advanced options of Windows 8 Recovery. In order to start your Windows 8 in Safe Mode, you need to click on the Startup Settings which will allow you to boot the Windows 8 to Safe Mode. The Automatic Repair option is also present in the Advanced Options of Windows 8. In case you are still reading, you will understand for yourself how Microsoft has delayed the option of Safe Mode so late in the Automatic Recovery options.

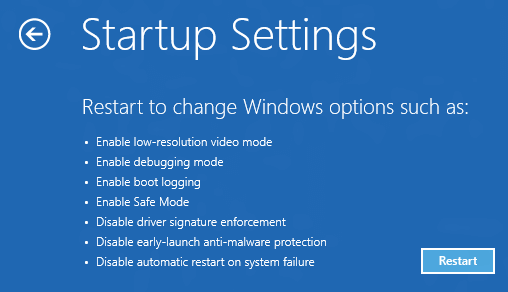
Modify Windows 8 Startup Settings to boot in Safe Mode

Modify Windows 8 Startup Settings to boot in Safe Mode

The Startup Settings gives you way to Start Windows 8 in Safe Mode by enabling low-resolution video mode, enabling the safe mode and other options as displayed in the screenshot above. Yes getting into Safe Mode was relatively easier in other version of Windows such as Windows 7, Vista, etc. In case you would like to run your normally running Windows 8 Computer to safe mode, all you need to do is launch the msconfig utility and modify the Startup Options as displayed in the screenshot below.

Windows 8 System Configuration

Windows 8 System Configuration

The msconfig command on the command prompt displays a System Configuration tabbed window. You would need to navigate to the Boot Tab of the System Configuration Software Utility and enable the Safe Mode. When enabling the Safe Mode in Windows 8 the Windows 8 will display Safe Mode written on all the 4 corners of the screen and will open up a help window. You can also enable Networking support in Safe Mode of Windows 8 as displayed in the screenshot below.

Windows 8 Safe Mode with Network Support using System Configuration

Windows 8 Safe Mode with Network Support using System Configuration

The Networking Support in Safe Mode can be of real help to get assistance from Internet. Yes you would need to authenticate yourself in order to logon to your account even in Safe Mode. The Advanced Options button on the System Configuration allows you to specify Number of processors, Maximum Amount of Memory to use and other options when booting the Windows 8 in Safe Mode.

File Management Software Applications for Windows

Managing Files on a Windows Computer can be really easy and quick to do with appropriate software applications or utilities. Yes Microsoft provided Windows Explorer to manage files, but many times a small file management software can do wonders and get your results in no time. This post talks about few such File Management Utilities which are free to download and yes they work fine on Windows 8. Most of the File Management Software Utilities presented here are 32 bit applications but they work just fine on 64 bit versions of Microsoft Operating Systems.

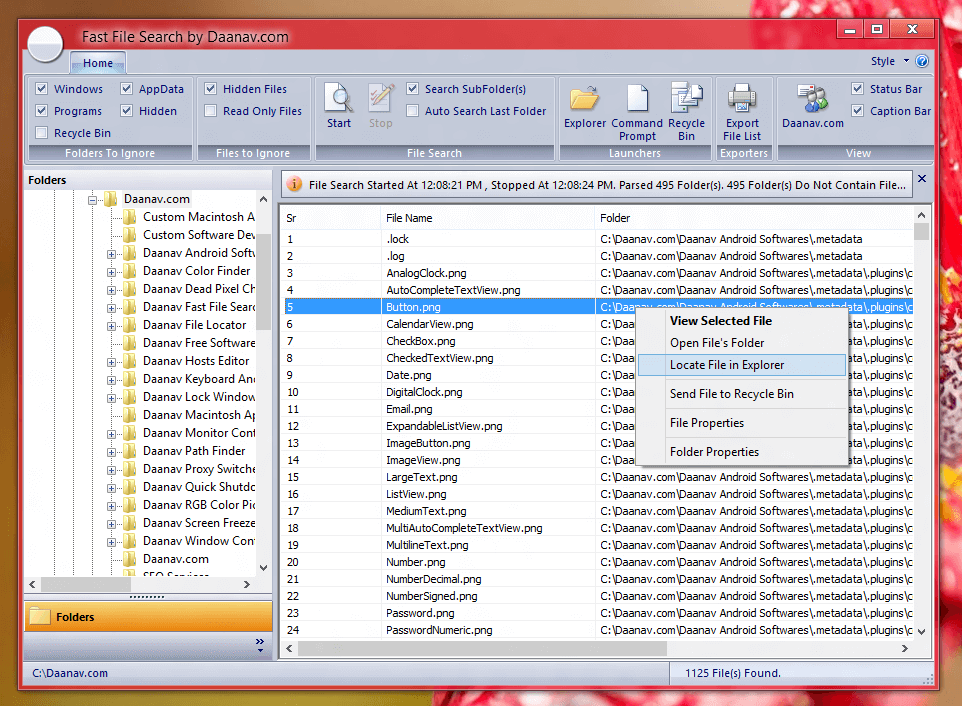
File Management Software to Search For Files Really Fast

File Management Software to Search For Files Really Fast

Let’s Start the tour of our File Management Software by listing a simple and free utility which can provide you super fast file search. This can be a really powerful tool to start managing your files with ease. Get a list of files you wish to manage with this Fast File Search Utility and then use the Right Click menu to verify / view the files found. This Fast File Search Application does not queries extra details from the operating system and hence the search is really fast. This File Management Software does not serves as a complete Windows Explorer Replacement, but when using this Fast Search Utility, you can forget about the inbuilt search of Microsoft Windows in search of files. This Application does not uses the File Search Index Service and provides better results as compared to the default Windows Search for Files.

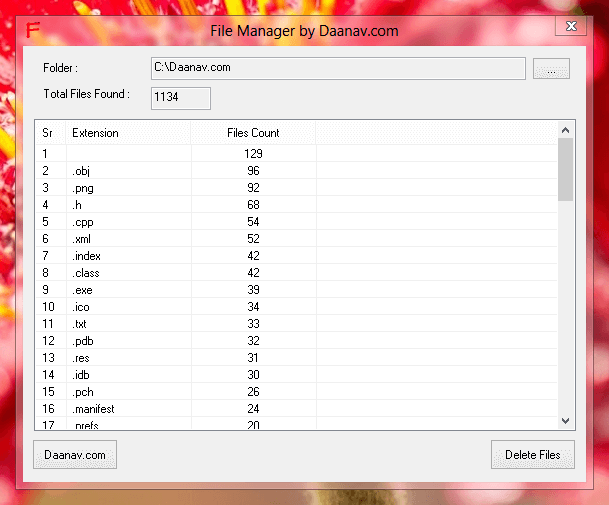
File Management Software to Delete Files by Extension

File Management Software to Delete Files by Extension

In order to manage files on your computer, you need to know anything about the files. In case you do want to manage files in a specific folder with a specific extension, then the best file management software would be the File Manager Application. This unique utility allows you to get a count of files grouped by file extension. This File Management Software can be useful to find out which files are taking up space on your hard disk. As the Software allows you to select a folder to enumerate list of files, you can select any drive’s folder or even drive of your USB or Camera Drive. The Software also allows you to send files of selected extension to the recycle bin from where you can permanently delete the files to free up your disk space.

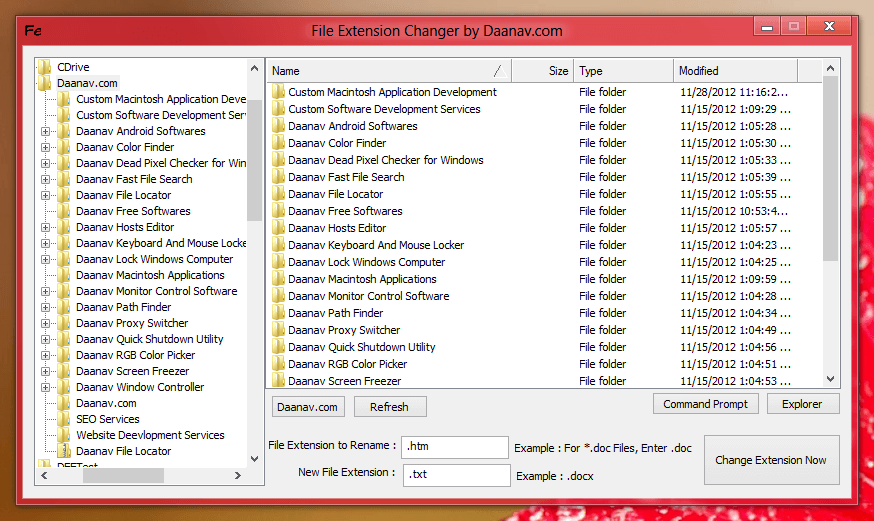
File Management Software to Change Extension of Multiple Files

File Management Software to Change Extension of Multiple Files

File Extensions play an important role in Windows and other operating Systems. File Management Software presented above helps you to change file extension of multiple files easily and quickly. Changing File Extension is not file conversion and it is just changing the file extension. File Extensions are stored in Registry Database and helps the Windows Explorer and other Custom Software Applications to determine which Application must be use to open file of specific extension. As displayed in the screenshot above, the File Management Software for managing File Extensions is all set to change file extensions of all files found in the selected folder from .htm to .txt. Once all the .html files have been changed to .txt file extension, the serach for .htm files in the selected folder would not list any files. Find out more about this free File Management Software which is titled as File Extension Changer and works fine on a Windows 8 computer.

File Management Software to Locate Application Files

File Management Software to Locate Application Files

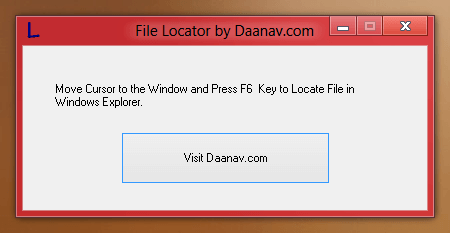
The File Management Software presented above is also a file finder, but of different type. This Application Software helps you to find File Location of Application Files with the use of any popup or application Window. The File Locator can be really handy when you do receive a popup message from some application, and you want to locate the application file in Windows Explorer so that you can delete it or manage it depending on the application window. Many times various software applications even when uninstalled keep on popping up windows to buy the software and when you want to delete such popup window, this File Locator can be really handy. Windows Task Manager also provides an option to locate an Application in Windows Explorer. This Utility also locates file in Windows Explorer as Windows Task manager do.

File Management Software to Copy Files in a Super Fast Mode

File Management Software to Copy Files in a Super Fast Mode

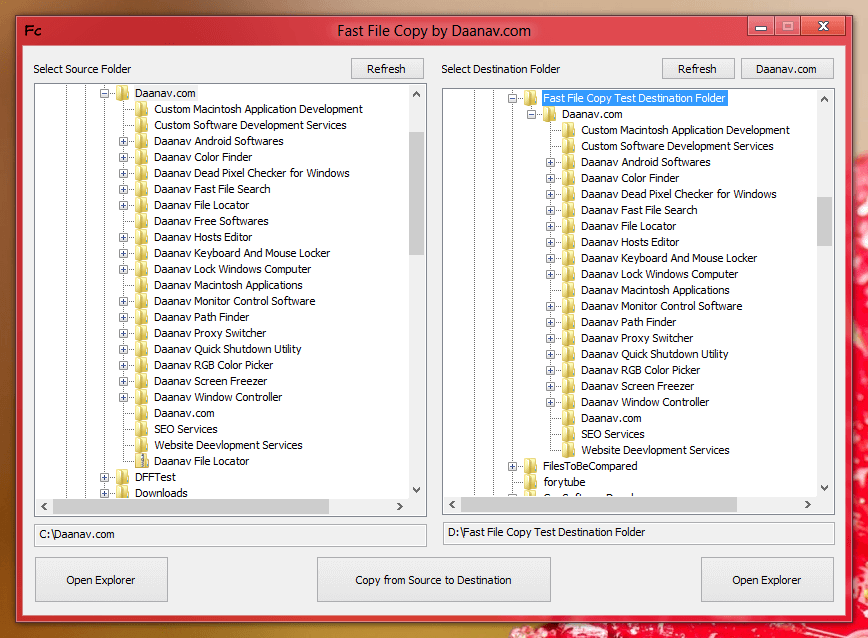
No List of File management Software Applications can be complete without having a File Copy Software. Windows Explorer requires you to do multiple mouse clicks to copy files from one folder or drive or another drive or folder. The File Management Software presented above helps you to copy files by doing a visual verification of source file(s) and folder(s). The Fast File Copy Software Application presented above has two different tree controls to view the source folder and the destination folder. The Copying of File done by the Software is done using Windows Explorer Commands with appropriate visual indication of the files being copied. When you do know and understand the contents of source folder and destination folder, it can be really time saving and fast.

All the File Management software applications presented above works fine on Windows 8, Windows 7 and other versions of Microsoft Windows Operating Systems for Desktops and Laptops running on Intel Architecture of either 32 bit or 64 bit. All the above software utilities are free to download and use and all are developed to make your day to day file management tasks easier and fast. In case none of the File Management Software Application provides you the exact Software Solution you are looking for, you can get Custom Software Application Developed for you intended file management activities. Whether you need Software Applications with Manual Control or even Automated Software Applications, all you need to have is an idea.