Windows Screen Saver

Screen Saver for Windows are basically application programs which can be configured using the Windows Screen saver Settings. This post provides more information on how you can effectively use Windows Screen Savers. There are lots of tips and tricks provided in this post which can be really helpful to figure out how to use Windows Screen Saver effectively and make sure that they work as you want them to work. Lots of Screenshots are provided in this post which can also visually help you to fully understand the behavior, functionality and give you full control over Screen Savers in Windows.
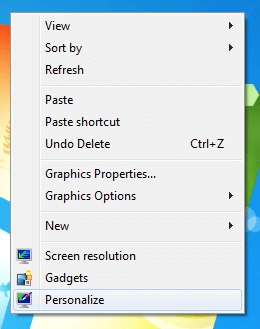
Launch Personalize Settings to Configure ScreenSaver

Launch Personalize Settings to Configure Screen Saver

The Above Screenshot displays how you can launch Personalize Control Panel Option in Windows 7 to configure Screen Saver. All you need to configure the Screen Saver is to right click on an empty area on Desktop and Click on Personalize menu option. Yes there are other ways in which you can configure Screen Saver Settings, but the above mentioned way to configure Screen saver in Windows is the easiest way. Given below is alternative way in which you can launch Screen Saver Settings of Control Panel to configure Screen saver for your Windows Computer.
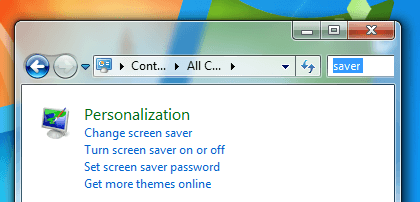
Launch Screen Saver Settings from Control Panel

Launch Screen Saver Settings from Control Panel

The above screenshot displays how to launch Screen saver Settings from Control Panel. All you need to do launch Screen Saver Settings from Control Panel is to search for the word Saver or you can even search for Screen in the Control Panel Search box as displayed in the screenshot above. In case you do change Windows Screen saver multiple times, you might prefer to create a desktop shortcut to launch Screen Saver Settings with one single mouse click.
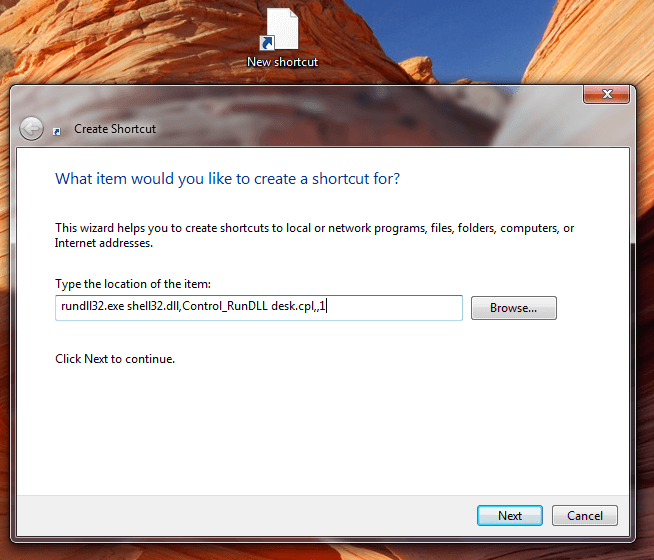
Desktop Shortcut to Launch Screen Saver Settings

Desktop Shortcut to Launch Screen Saver Settings

In order to create a Desktop Shortcut to launch Screen Saver Settings of Control Panel, right click on the Desktop and click on New Shortcut. Once the New Shortcut Wizard appears, enter rundll32 shell32.dll,Control_RunDLL desk.cpl,,1 and click on Next as displayed in the screenshot above. Once you have created the desktop shortcut, you can launch the Screen Saver Settings from the Desktop Shortcut easily as you can launch any other program or application. Once you have launched the Screen Saver Settings, you can change Power Settings, change the Screen Saver, Disable the Screen Saver, Change the Screen saver Time Out, Modify Screen Saver Settings, View Screen Saver Preview and configure whether Windows must display the Logon Screen on resume of your Windows Session. The Windows Screen Saver Settings option of Windows Control Panel is as displayed below.
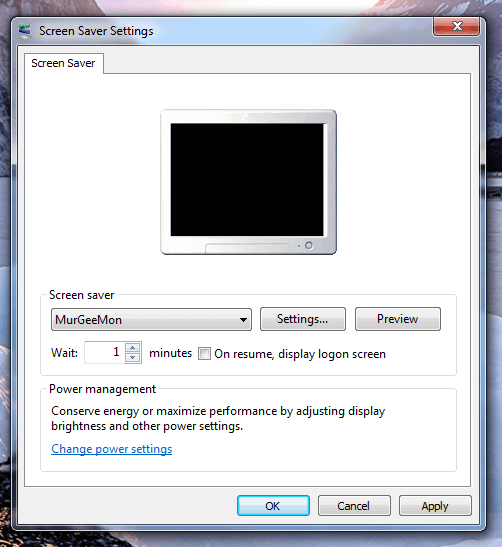
Windows Screen Saver Settings

Windows Screen Saver Settings

Screen Savers has a .scr file extension and are typically located in System32 Folder of Windows (e.g. C:WindowsSystem32). As mentioned in the first paragraph of this post, the Screen Savers are basically .exe files which are renamed to a .scr file extension and Screen savers communicate with Screen Saver Settings Control Panel and Windows using Command Line Parameters. As Screen Saver are standard Windows Applications, they have access to your Windows Computer as other Applications do.  System32 is a Windows Protected Folder and Admin Access is required to modify the contents of the folder.
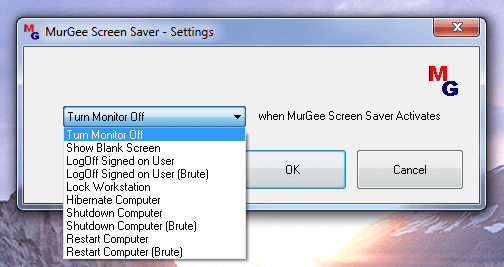
Screen Saver to Shutdown Computer

Screen Saver to Shutdown Computer

Screen Savers were created to save Computer Monitors and save Electricity. Computer Monitors were initially created using CRT technology which consumed lots of power and they generated heat as well. Now a days with the invention of low power monitors and new technologies like Direct X, the Screen Savers have evolved from simple automated text displays to full 3D display along with sound and other animation. Network Engineers often enforce all workstation of a network  to have a Screen Saver promoting Company’s Brand or Website. There are lots of Screen Savers developed by companies offering free or trial screen savers to customers. The Shutdown Screen Saver as displayed above lets users control their computer with computer control commands such as Shutdown, Restart, Log Off or even Display a Blank Screen.
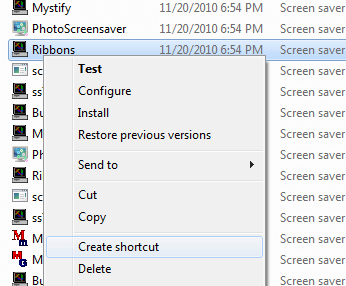
Create Desktop Shortcut to Launch Screen saver

Create Desktop Shortcut to Launch Screen saver

In order to Launch a Screen Saver from a Desktop Shortcut, you need to locate the Screen saver in the System 32 Folder and Right Click on it and select the option to create a Desktop Shortcut. Do not use the method the new shortcut wizard to create a Desktop Shortcut to Launch the Screen Saver and instead use the Create Shortcut Method. Once you have created a Desktop Shortcut to launch the Screen Saver, you can assign keyboard shortcut to the Desktop Shortcut using Shortcut Properties as displayed in the Screenshot below.
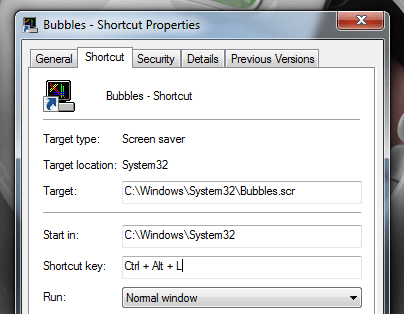
Keyboard Shortcut to Launch Screen saver

Keyboard Shortcut to Launch Screen saver

The Screen savers are normally displayed on the primary monitor of a Multiple Monitor Windows Computer. There are different kinds of software application available which are of help to Multiple Monitor Windows Computer users in regards to Screen Savers. Some Screen Savers allow user to configure separate Screen Saver for every Monitor, whereas some Software Applications display Screen Savers in a small re sizable Window,etc. Screen savers provided by Microsoft often run with Direct X installed on Windows Computers.

Logon Screen Saver

Logon Screen Saver

Screen Savers can be configured on a per user account basis, forced screen saver with Group Policy Editor or even for the Logon Screen. Screen Saver configured for the Logon Screen must not be dependent on Direct X, although you can configure any Screen Saver for the Logon Screen. The Screen Savers automatically close with Manual Mouse Movement, Manual Keyboard Key Press,  when any application simulates any type of Mouse Input or Keyboard Input to the Windows Computer or when some application displays a System Message Prompt which needs user attention.
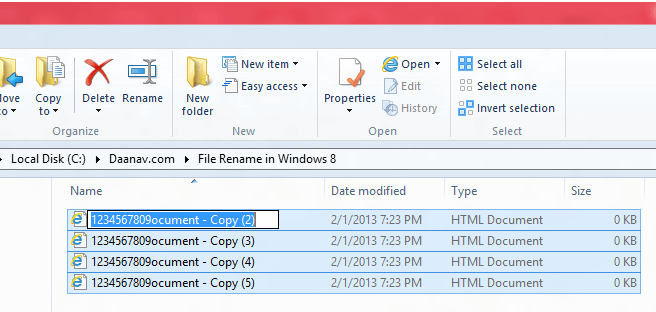
Rename Files in Windows 8

There are multiple way in which you can rename files in Windows 8. You can rename files from Windows Explorer, with ren command run from either command line or a batch file or with a 3rd party software application. This post outlines all 3 methods to rename single or multiple files in Windows 8. The easiest way to rename multiple files in Windows 8 is from Windows Explorer. Just select Single or Multiple Files to Rename and press the keyboard Shortcut F2 to enter new name for all the files as displayed in the screenshot below. You can even Right Click on any of the File(s) listed in Windows Explorer and Select the Rename menu Item to Rename Single or Multiple Files in Windows 8. You can even Undo the File Rename of Single or Multiple Files in Windows Explorer using the Ctrl + Z Keyboard Shortcut.

Rename Multiple Files in Windows 8 Explorer

Rename Multiple Files in Windows 8 Explorer

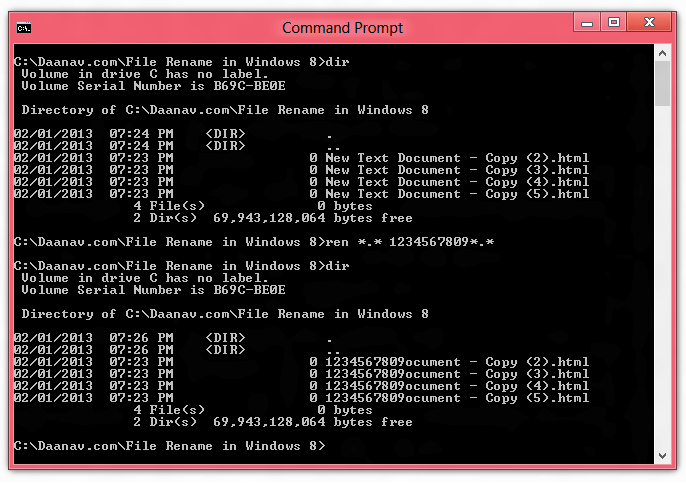
The Command Prompt along with ren command gives you more power and control over the file renaming process. In case you do have to frequently rename files in bulk, you can even create a batch (.bat) file with ren and other commands to automate the file renaming process. The ren command allows you to rename File Names, File Extensions and much more. This post gives you two examples and displays how to use the ren command in the command prompt window.

ren Command in Windows 8 to Rename Single or Multiple Files

ren Command in Windows 8 to Rename Single or Multiple Files

The above screenshot displays the ren command in help mode. Note that ren command is followed by /? and effectively it prints the usage of the ren command. Yes the ren command works with older Windows Operating Systems as well. When using the ren command in Windows 8, be careful and do test the functionality with some test files before doing actual file renaming.

Rename Multiple Files in Windows 8

Rename Multiple Files in Windows 8

The above screenshot displays first example of the ren command in Windows 8. The dir command is used in this example to get a list of all files present in the folder. Once list of files in the folder is displayed the above example uses the ren command to rename multiple files by appending a string to all the file names and then it again displays the list of files with the dir command. The next example displays how you can change file extension with the ren command on the command prompt of Windows 8.

Change File Extension in Windows 8 with ren Command

Change File Extension in Windows 8 with ren Command

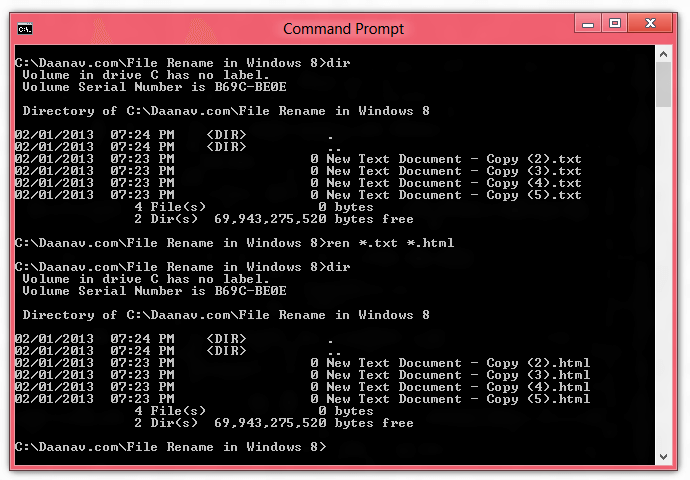
The above example uses the ren command to change file extension of multiple files. This second example of the ren command also lists files before changing file extension and then it changes file extension of multiple files with a single command and finally it again lists the files using the dir command. You can also issue rename command in Windows 8 instead of the short ren command to produce the same result. In case you are not very comfortable with complex command prompt syntax, the next method of renaming multiple files can be of interest to you.

File Renamer on Windows 8

File Renamer on Windows 8

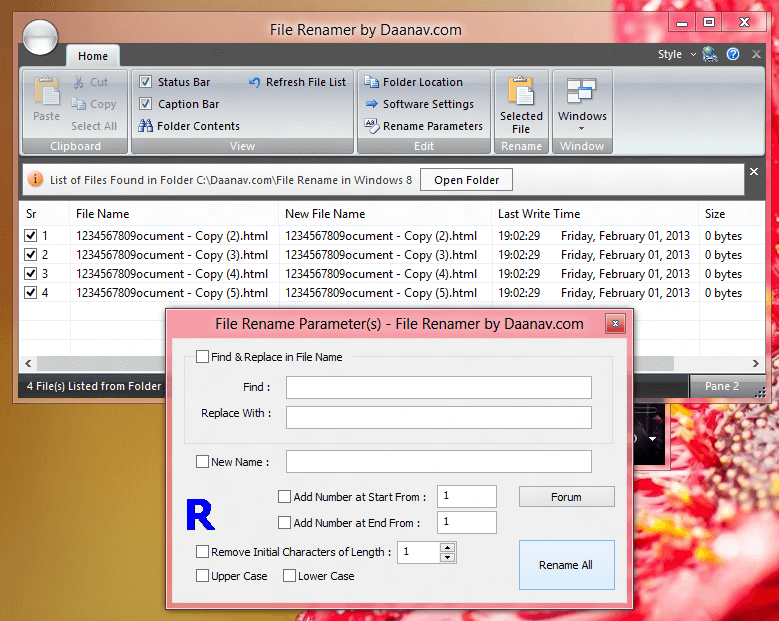
Use a 3rd party software utility to provide you file renaming functionality. The software screenshot above displays how you can rename single or multiple files with File Renamer utility on your Windows 8 Computer. Using a Software Application to handle File Renaming can save you time and efforts and simultaneously save you from learning complex syntax and usages of command line commands provided by Windows 8.

Bulk SMS Software Utility for Windows

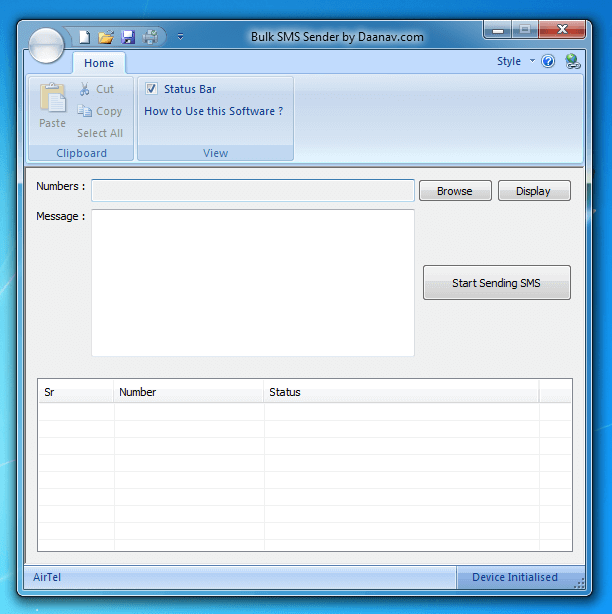
Send Bulk SMS from your Windows Computer with Bulk SMS Software Application for Windows. Use your Mobile Modem like 3G Modem or 4G Modem with SIM Card to send a single SMS Message to multiple users. The Bulk SMS Software Application presented here provides a really easy to understand user interface and can be learned in a couple of minutes. The SMS Message to be sent out has to be entered in the Bulk SMS Software itself and the Mobile Numbers are to be stored in a .txt Unicode file. The Bulk SMS Software displays confirmation message for every SMS message in it’s user interface.

Bulk SMS Sender Windows Utility

Bulk SMS Sender Windows Utility

Download this Bulk SMS Software from Daanav.com on any Windows 7  or Windows 8 Computer. In case you are using Windows Vista or Windows XP, then this Bulk SMS Software will not work on your Windows Computer and you would need access to a Windows 7 or Windows 8 computer running on either 32 bit or 64 bit architecture. This Bulk SMS Software itself is a unicode application however it can send SMS Messages in English language only.

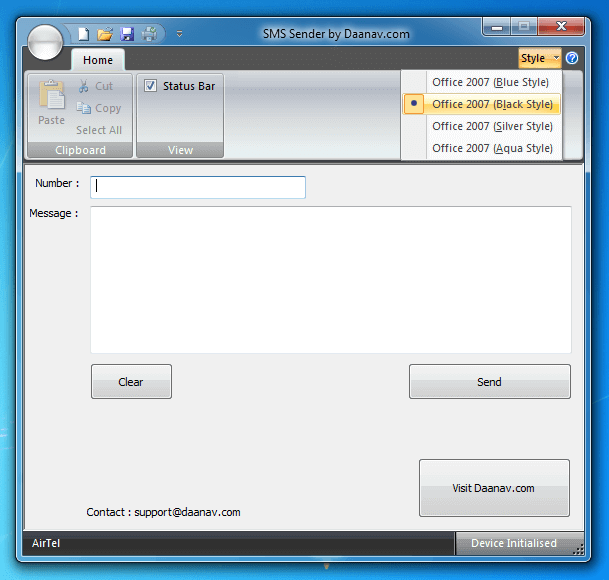
Sending Bulk SMS Messages using this software given you freedom to select best Mobile Operator and best SMS Plan and you can easily manage the charges applicable to your SIM card using either Pre Paid or Post Paid Mobile Plans. This Bulk SMS Software send your SMS Messages in PDU format and has been tested on GSM Modems. Once you connect your Mobile Modem to your Computer, the Bulk SMS Software will detect the Modem automatically and will display appropriate information. Once this Bulk SMS Software detects the Mobile Modem, it displays the Mobile Operator Name at the bottom left corner of the software as displayed in the screenshot above.

Mobile Numbers in a Unicode File

Mobile Numbers in a Unicode File

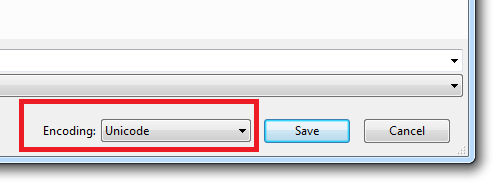
As displayed in the above screenshot, this Bulk SMS Software needs you to store all the Mobile Numbers in a .txt file created with Notepad in Unicode Encoding. By default Notepad stores the .txt files in ANSI encoding and as this Bulk SMS Software has to read the Mobile Numbers from the .txt file, you must store the file in Unicode Encoding as displayed in the above screenshot. This Bulk SMS Software Application is available at Daanav.com website along with other SMS Applications. In case you need some changes to be done in the Bulk SMS Software or any other Software Application, you can avail the Custom Software Development Services and get the Software Application to work exactly as you would like it to work.

Send SMS from Windows Computer

Sending SMS from your Windows Computer running Windows 7 or Windows 8 is now really easy and quick with Daanav SMS Sender. All you need to send SMS from your Windows Computer is an appropriate SIM Card with appropriate money in it and a Data Modem. The Charges of Sending SMS Messages will depend on your mobile plan and you do not need to pay anything to any online SMS Gateway or something like that. Just insert your Data Modem in your Computer’s USB Port and launch the Daanav SMS Sender Software. Yes you would need to install any appropriate Data Modem’s drivers before using this SMS Sending Application.

Daanav SMS Sender

Daanav SMS Sender

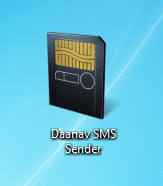
The above screenshot displays the application file with an icon of SIM Card. Whether you wish to send Local, National or International SMS Messages, you can send all with this SMS Sender Application for Windows. Just remember that the charges applicable for every SMS Message are decided by your mobile operator and you effective plan. Many Mobile Operators do have special SMS plans and they are really cheap. Do enquire your Mobile Company about the SMS Pack so as to get maximum number of SMS Messages.

Send SMS from Windows Computer

Send SMS from Windows Computer

The above screenshot displays the main screen of the Daanav SMS Sender Application. In order to send SMS Message, all you need to do is enter the Mobile Number and the desired message and press the send button once. Within a couple of seconds you should receive a confirmation of the SMS Message Sent. Note that the Mobile Operator Name is visible in the Status bar of the software as a 3G Data Modem has already been connected to this Windows 7 computer.

Do download this SMS Sender Application from the author’s website i.e. Daanav.com and give it a try. There are other SMS Software Applications available for download on the author’s website. Many of the SMS Utilities are free and many are available on a free to try basis. The best part of using a Windows Application to send Single or even Bulk SMS is that you get full control over the money spent, you do get the choice of Mobile Operator Selection and even selection of SMS Plan. You can use this SMS Software on any Windows 7 or Windows 8 Computer running on 32 bit or 64 bit architecture.

Windows 8 Shutdown Software

You can Shutdown Windows 8 in lots of different ways. The Windows 8 Shutdown Software presented here allows you to schedule automatic shutdown of your Windows 8 computer. The Software Application presented here comes bundled with all the techniques of using a Microsoft Windows Operating System like Desktop Shortcut, Keyboard Shortcut, Jumplist Tasks, Shutdown Timers, Notification Area Icon and much more. This post presents a brief overview of this Windows 8 shutdown software by displaying a few screenshots of the software and a Windows 8 Shutdown Software Video Tutorial.

File Menu of Windows Shutdown Software

File Menu of Windows Shutdown Software

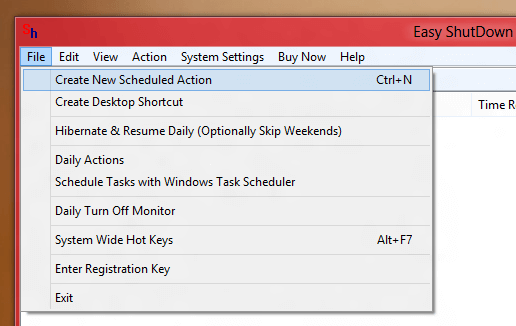
Given above is the screenshot of the File Menu of the Windows 8 Shutdown Software displaying main functionality of the software. This Menu allows to schedule Windows 8 Shutdown at a specific time daily, with a keyboard shortcut, as per defined scheduled (like shutdown after 4 hours, shutdown at specific time only one or on a range of days, etc) and some extra Windows 8 control features. other Windows 8 Control Actions such as Restarting , Hibernating a Windows 8 computer and other features are already present in this Windows 8 Shutdown Software.

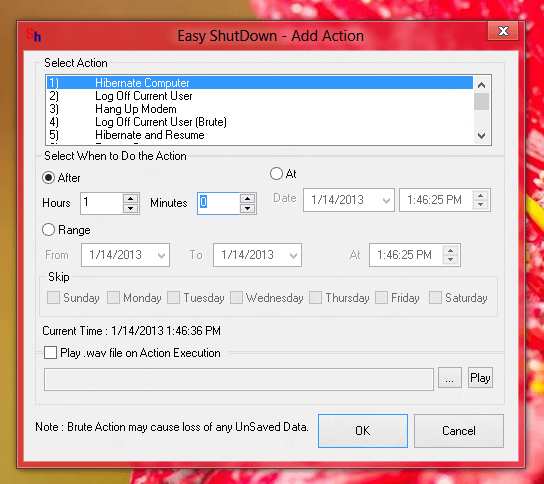
Hibernate Windows Computer with Windows Shutdown Software

Hibernate Windows Computer with Windows Shutdown Software

As displayed in the above screenshot, you there are 3 different ways in which you can add Shutdown , Hibernate, Restart and other Computer Control Actions. You can even specify the range of days on which you want this Windows 8 Shutdown Software to initiate the configured actions. All the Computer Control Actions Added in the Software are displayed in the Main Window of the Software from where you can edit or delete the computer control actions. In the above screenshot an action is about to be added to be executed after 1 hour to Hibernate this Windows 8 64 bit computer.

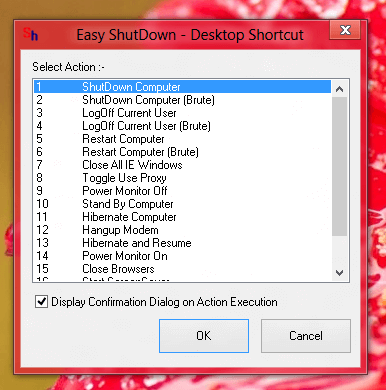
Shutdown Shortcut with Windows Shutdown Software

Shutdown Shortcut with Windows Shutdown Software

Many times you would want to Shutdown your Windows 8 computer without schedule or even Restart your Computer. This Windows 8 Shutdown Software allows you to create Shortcuts on Desktop to Shutdown, Restart, Hibernate, and initiate other Computer Control Commands as displayed in the screenshot above. Before executing the action, the desktop shortcut can be configured to ask for confirmation as configurable by the above screen of the software.

In case you would like to download and try out the software, you can visit the Easy Shutdown Software Website and download a free trial right now. There are no registration forms to be filled in and you do not need to provide you credit card information to the software for simply trying out whether the software is suitable for your purpose of scheduling automatic and scheduled shutdown of your Windows computer(s).

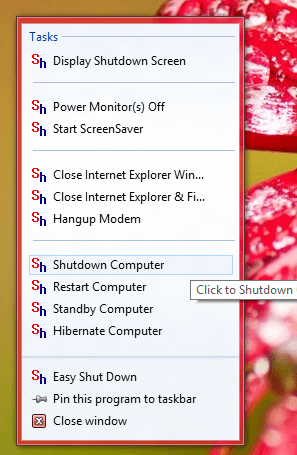
Jumplist of the Windows Shutdown Software

Jumplist of the Windows Shutdown Software

As displayed above in the screenshot, you can even use the Jumplist tasks added to the icon of Windows Shutdown Software Icon in Taskbar. This Jumplist feature is present in Windows 7 and on Windows 8 and all you need to do is right click on the icon in taskbar. There are lots of other useful and handy features in this Windows Shutdown Software and apart from the Jumplist feature, all the features work on Windows XP, Windows Vista, Windows 7, Windows 8, Windows 2000 Server and other versions. Yes you can simply download and give it a try right now.