Change Default Browser in Windows 8

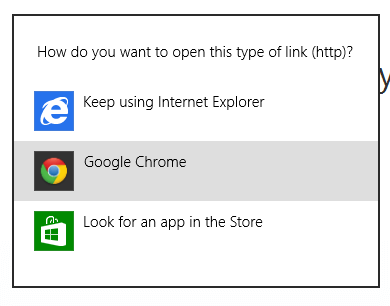
Default Browser on Windows 8 is the application that opens up automatically when you either click on a Link in any application or you open a http or other web related file. Windows 8 allows you to select a default application according to the file extension and protocols. There are lots of protocols and file extensions that Windows 8 handles and supports. Changing Default Browser is a technically associating file types and protocols with selected application. Most of the browsers when installed on Windows 8 allow you to either keep the currently configured browser, configure new browser as default browser or even look for another browser on Windows 8 Store as displayed below.

Default Program for http Protocol

Default Program for http Protocol

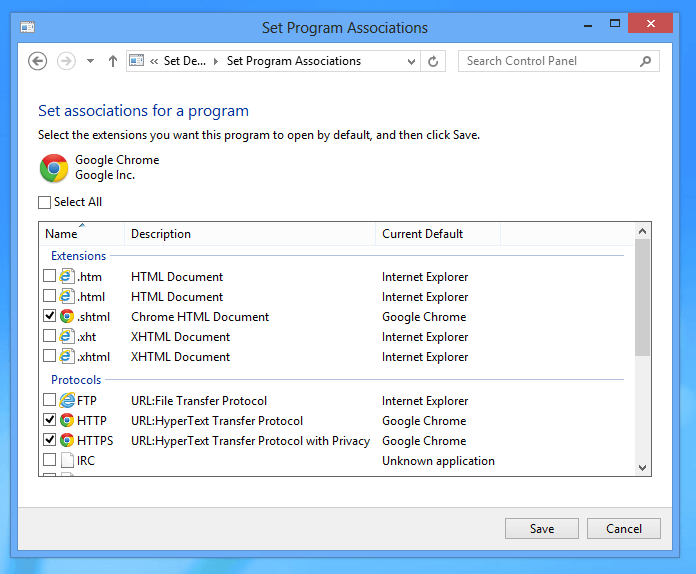
The above screenshot was captured on Windows 8 after installing the Chrome Browser. All the Associations of files and protocols are stored in registry database from which Windows 8 looks up as and when needed. This post further describes how you can change the default browser configured on your Windows 8 computer. You can either configure a single or multiple browser(s) to handle all the protocols and file types related to Internet. The given below screenshot displays a Windows 8 Computer on which some protocols and internet file types are associated with Internet Explorer and other with Google Chrome.

Set Program Associations on Windows 8

Set Program Associations on Windows 8

All the File and Protocol Associations for Browsers and other Applications can be done using Windows 8 Control Panel. In order to change default browser on your Windows 8 computer, all you need to do is launch the Program Associations Control Panel Applet, Select the Browser from the List and make it default. The given below screenshots can be of assistance in order to change the default browser on your Windows 8 computer.

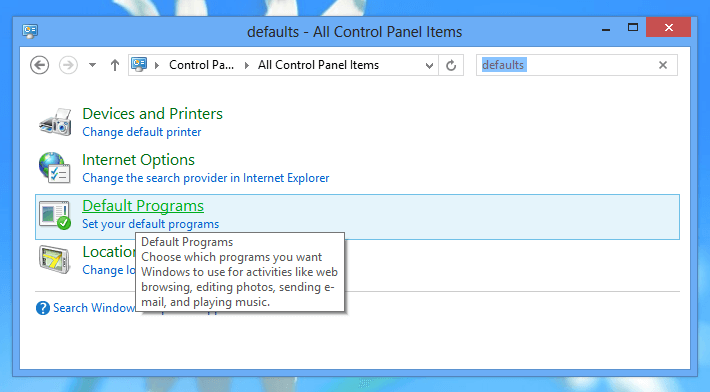
Change Default Programs from Control Panel

Change Default Programs from Control Panel

The above screenshot displays how to locate the Control Panel Category of Default Programs in order to change the Default Browser. Launch Control Panel and search for the word default as displayed in the screenshot above to locate the Default Programs Category and click on the Set your default programs link as displayed above. This will open up another Window which will scan registry database and will load currently configured default programs and browsers as displayed in the screenshot below.

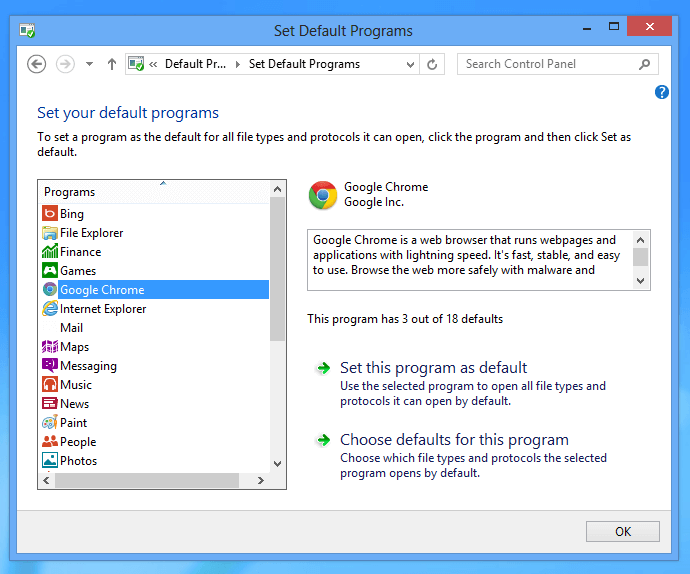
Change Default Browser on Windows 8

Change Default Browser on Windows 8

Once you have reached the Set Default Programs Screen, locate and click on the Browser you wish to set as default from the list on the left hand side of the screen. Once you have selected your new default browser, click on either of the buttons labelled Set this program as default or Choose defaults for this program. Most of the browsers do check whether they are the default browser or not, however if you have disabled the default browser check functionality, then control panel is your friend and helper to change the default browser on Windows 8.

.NET in Windows 8

Windows 8 does have .NET version 4.5 included in the default installation and you do not need to download .NET version 4 on a Windows 8 Computer. However the story of .NET on Windows 8 is not quite simple and yes there are twists to the story of .NET in Windows 8. This post provides required information and help in case you are struggling with .NET issue on Windows 8. Appropriate screenshots have been provided which have been captured on Windows 8 computer to visually assist you in getting your .NET application up and running.

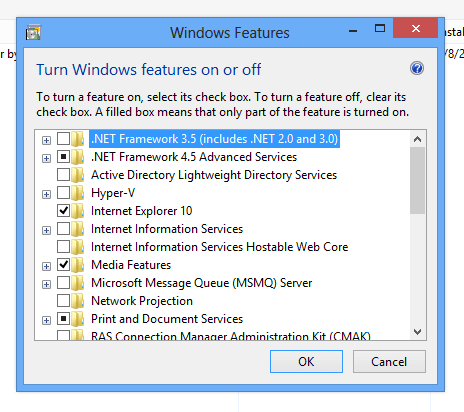
Configure Windows 8 Features

Configure Windows 8 Features

The above screenshot displays the Windows Features screenshot launched from the Windows 8 Control Panel’s Programs and Features option as displayed in the screenshot below. Note that default Windows 8 installation does contains .NET Framework 4.5 Advanced Services installed, however .NET Framework 3.5 (which includes .NET 2.0 and .NET 3.0) are not installed.

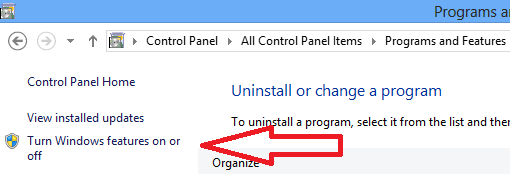
Turn Windows 8 Features On or Off

Turn Windows 8 Features On or Off

In order to view the option to view the .NET version installed on your Windows 8 computer, open up Control Panel and navigate to Programs and Features option. Now in order to check the .NET version, click on the Turn Windows features on or off link as displayed in the screenshot above. You would need admin access in order to change any of the Windows 8 features.

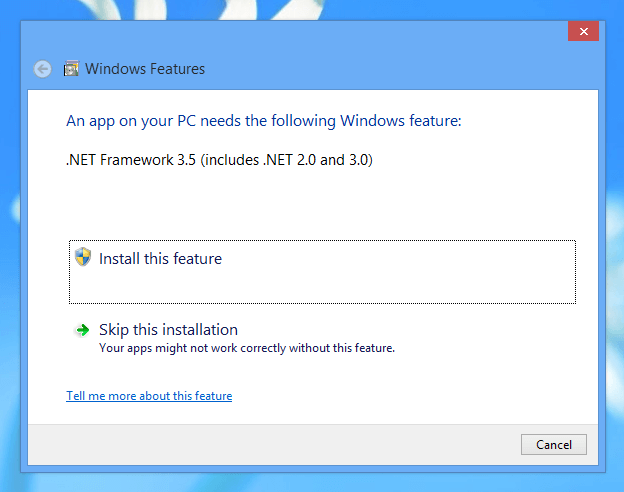
.NET 3.5 on Windows 8

.NET 3.5 on Windows 8

Prior to Windows 8 like Windows 7, Windows Vista or even on Windows XP, most of the 3rd party applications used .NET Framework 1.1, 2.0 or even .NET Framework 3.5 which was required to be downloaded from Microsoft Website or accompanied with 3rd party software application setup. Now with Windows 8 you do not need to download .NET Framework 4.x series as it is already included in the operating system.

An Application compiled with .NET Framework 2.0 or .NET 3.5 can still be used on Windows 8, however you would need to install it on Windows 8. Yes even if you do have .NET 4.5 installed on your Windows 8 computer, you would still need to download .NET 3.5 in order to use an application built with .NET 2.0 or .NET Framework 3.5. Applications compiled with .NET Framework 1.1 do not work on Windows 8. In case you want to run a >NET 1.1 Application on Windows 8, do contact the software developer and get the application compiled with .NET 2.0, .NET 3.5 or even with .NET 4.5.

Text to Voice Software

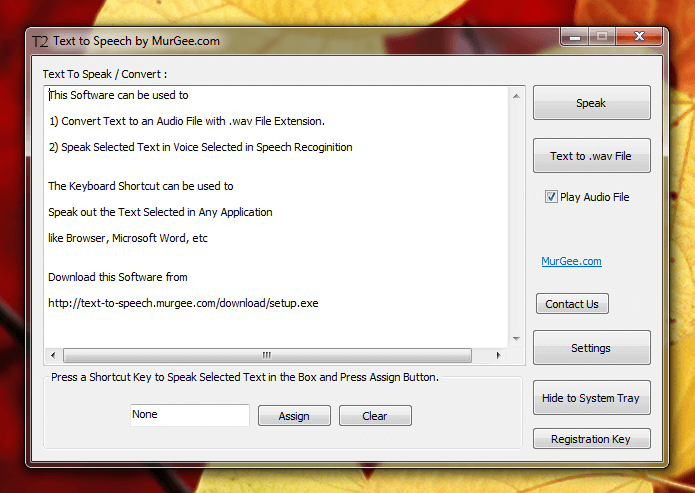
This post presents a Text to Voice Software which can be used on Windows 8, Windows 7 and other versions of Microsoft Windows Operating Systems. You can use this Text to Voice Utility in either of the two ways supported. You can simply type the text to be converted to an Audio File (with .wav file extension) or you can define a Global Keyboard Shortcut which would effectively work as a Selected Text Speaker or Reader. In order to listen to the voice or the audio file created, you would need to have speakers attached to your Windows Operating System. Given below is the main screen of the Text to Voice Software which is basically a single window application providing easy access to all the features provided by the utility.

Text to Voice Software

Text to Voice Software

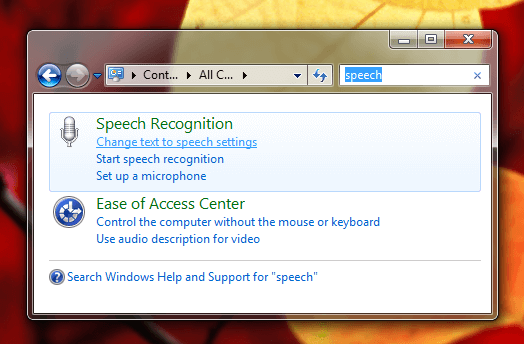
Download and try out this Text to Voice Software Utility for free on your Windows Computer. The Voice Spoken by this Software can be configured from Windows Control Panel as displayed below. All you need to do is open Control Panel and search for the word speech as displayed below in the screenshot and click on the hyperlink that reads Change text to speech settings. The given below screenshot has been captured on a Windows 7 computer, however the procedure remains the same for Windows 8 as well.

Change Text to Voice Settings from Control Panel

Change Text to Voice Settings from Control Panel

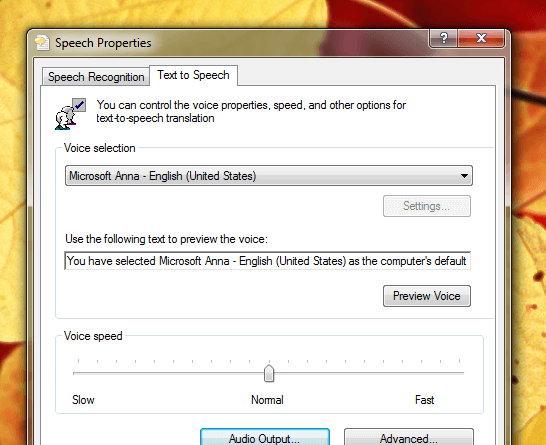
Microsoft provides free Voice in US English and UK English which is configurable from the Control Panel using the Speech Properties Control Panel Applet. The Button labelled Settings on the Text to Voice Software presented in this post can be used to launch the Speech Properties Control Panel Applet / Option. In case you would like to have the voice spoken in any other accent, you can buy a Speech from the Internet. This Text to Voice Software relies on the Speech Selected in the Control Panel and does not installs any extra Speech onto your Windows Computer.

Speech Properties from Windows Control Panel

Speech Properties from Windows Control Panel

The above screenshot displays the Speech Properties of Windows Control Panel which basically allows you to select the Voice in which the Converted Text will be spoken by the Text to Voice Software. As evident from the screenshot above, you can change the voice speed and even preview the voice from within the control panel. The Advanced options will be available only when you do have a speaker connected to your Windows Computer. Speech Recognition can also be configured from within the Control Panel which converts voice to text.

Whether you want this Text to Speech Software to read you Selected Text from a Browser Window or even from any Text Editor like Notepad or even Microsoft Word, the configured keyboard shortcut can be really handy. In order to use this Text to Voice Software as a Text Reader, do configure a Keyboard Shortcut and whenever you want the software to speak out text, simply select the appropriate text and press the keyboard shortcut to let this software convert text to voice in the speech configured in the Windows Control Panel. Converting Text to an Audio File is equally simple and intuitive to use. In order to convert text to an audio file, enter the text in the edit box of the Text to Voice Software and click on the Text to .wav button.

Send Sms with 3G Modem

Send SMS Message from your Windows Computer with the help of a 3G Modem and any of the SMS Software Applications presented here in this post. This post displays two different SMS Software Utilities which can be used for sending SMS Message to single or multiple mobile numbers. In case you would like to send a single SMS Message to a group of people, do have a look at the Bulk SMS Sender Software. However if you would like to send a single SMS Message to a Mobile Number, use the Simple and Easy SMS Sender Software and send as many SMS Messages as you like.

Send SMS in Bulk with 3G Modem

Send SMS in Bulk with 3G Modem

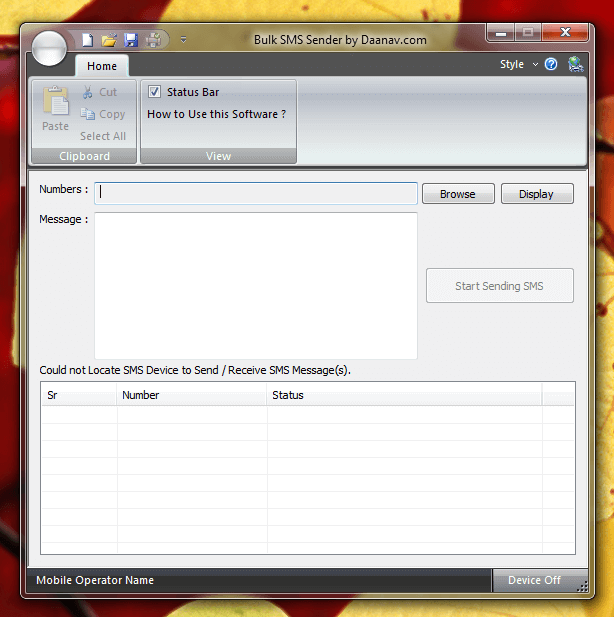
The above screenshot displays the Bulk SMS Software running on a Windows 7 Computer. The Main Window of Bulk SMS Software is the only single screen in the software with which you need to interact in order to send a single SMS message to large number of Mobile Numbers. The Software allows you to manually type in the text you wish to send to multiple recipients and allows you to specify a text file containing mobile numbers on each single line.

Bulk SMS Sender Desktop Shortcut

Bulk SMS Sender Desktop Shortcut

The above screenshot displays the Desktop Shortcut of the Bulk SMS Software which is created by the setup of the software. Have another look at the main screen of the Bulk SMS Software and note on the bottom left corner, the Mobile Operator Name is displayed. Whenever a compatible 3G Modem is connected to the Windows Computer, this Bulk SMS Software detects it automatically and displays the name of the Mobile Operator and enables the button to start sending Bulk SMS. In case you 3G Modem is not detected by this SMS Software, then try updating the software drivers for your 3G Modem or if you do have a different modem , give it a try.

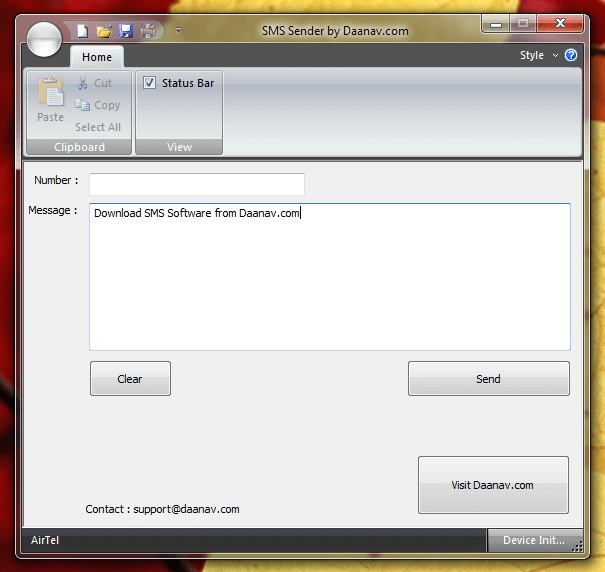
Another SMS Software to be used in conjunction with a 3G Modem is described in this paragraph. The Screenshot of the SMS Sender Software given below should give you an idea of how you can send SMS Messages using this SMS Sender Software. Note in the given below screenshot that the Mobile Operator Name is displayed in the bottom left corner and current status of the 3G modem as visible to the SMS Sender Software is displayed on the bottom right corner of the software.

SMS Sender for 3G Modem

SMS Sender for 3G Modem

In case you do have a 3G Modem or even a 4G Modem, download the SMS Software and start sending SMS Messages instantly. Yes the 3G SMS Software works with almost all the latest 3G Modems using Microsoft Provided Communication Methods. Yes many companies providing 3G Modem Software also provide SMS Sending and Receiving Capabilities. The best part of this SMS Software is it’s ease of use and almost anybody can send SMS Messages with this easy to use software within seconds.

Both SMS Sending Applications described above work with Windows 8 and have been tested with Windows 7 as well. In case you would like to see some changes in any of the SMS Software Applications presented above to send SMS Messages from a 3G Modem,  do contact the software developer and they should be able to provide you the required functionality. The SMS Applications presented above uses SMS APIs provided by Microsoft and hence provide you the best performance and results.

Uninstall Software from Windows

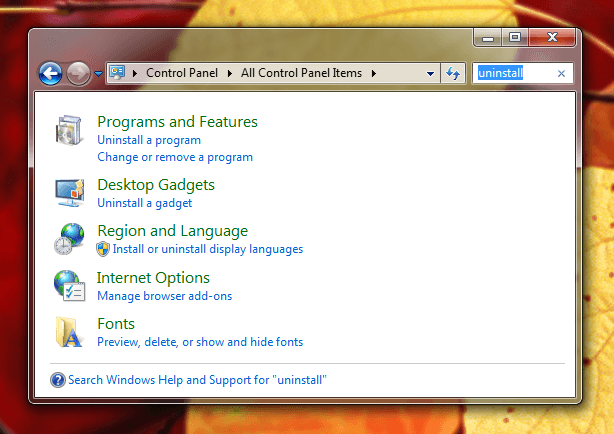
Uninstalling a Software from Windows Computer of any kind is described in this post. The Uninstallers have grown in technology and functionality provided as the software applications have grown. Depending on the software provider, a single setup application can provide lots of functionality like copying a software. The Screenshots displayed in this post have been captured on a Windows 7 Computer, however the similar methods applies for other versions of Microsoft Windows such as Windows 8, Windows Vista, etc. In case you want to uninstall or modify any kind of software on your Windows Computer, open up Control Panel and search for the word uninstall as displayed in the screenshot below.
Uninstall Software from Windows with Control Panel

Uninstall Software from Windows with Control Panel

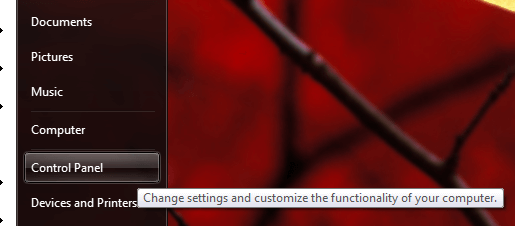
In case you are wondering how to launch Control Panel, read on below to find out multiple ways in which you can launch Control Panel. The given below screenshot displays the quickest way to launch Windows Control Panel is described by following the Start Menu of Windows 7. You can even launch Control Panel by creating a Desktop Shortcut to control.exe which is typically located in C:WindowsSystem32Control.exe. In case you are using Windows 8, do have a look at another post on this website which shows how to uninstall from Windows 8 . Apart from the differences in the way to launch Control Panel, rest of the process is the same for all Windows versions.
Launch Control Panel from Windows Start Menu

Launch Control Panel from Windows Start Menu

Now have a look at the first screenshot above which are basically the options available for uninstalling software, gadgets, displays language or even fonts. Depending on what type of software you want to uninstall from your Windows computer, select the appropriate option and then follow onscreen prompts. When you are uninstalling a program from your computer a setup wizard will guide you to either fully uninstall or modify components of any the selected program. Rule of thumb when uninstalling a software application, program or anything else is make sure that you fully understand what you are doing and carefully follow onscreen prompts. Yes you would need admin access to uninstall a software from your Windows computer as the various files are deleted when uninstalling software and this action will affect other users configured on the computer.

Software Uninstall Confirmation on Windows

Software Uninstall Confirmation on Windows

Depending on whether you are uninstalling a program, gadget, font, display language or anything else, you will get different confirmation screen for every type of the software. The above screenshot displays a confirmation box asking whether you want to really uninstall a program application from your windows computer with Yes and No Buttons. In case you click  on the Yes button and proceed ahead the program uninstall will start. Depending on the software you are uninstalling, different options will appear. Some Uninstallers allow you to modify the installed programs and some simply uninstall the software.
Delete Single or Multiple Fonts from Windows Computer

Delete Single or Multiple Fonts from Windows Computer

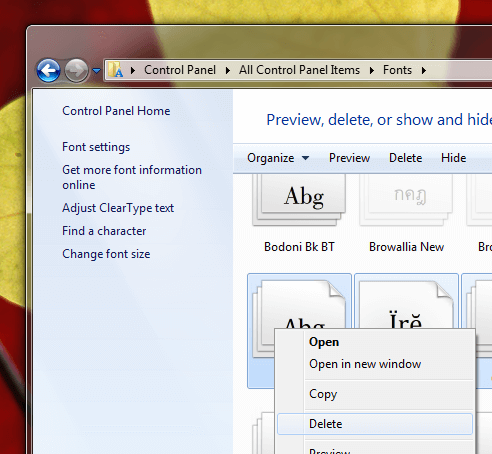
The above screenshot displays how you can uninstall or delete installed fonts on your Windows Computer. All you need to delete font(s) from your Windows Computer is preview fonts, select single or multiple font(s), right click on it and from the menu that appears, click on the Delete menu Item and you are done.
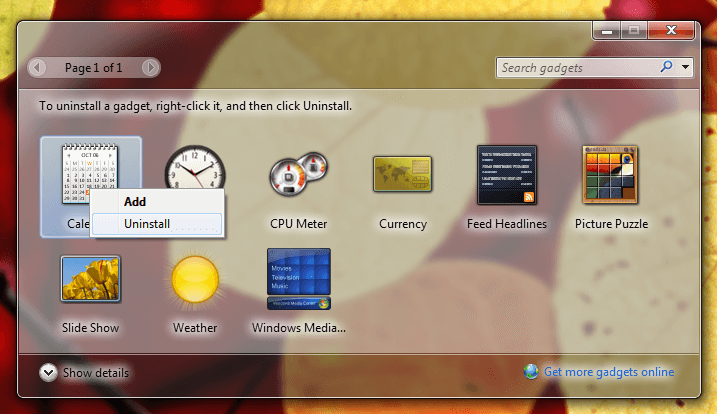
Uninstall Gadget from Windows Computer

Uninstall Gadget from Windows Computer

The above screenshot displays how you can uninstall a gadget from your Windows Computer. Removing Gadgets is easy and quick in Windows and all you need to do is select the gadget you wish to uninstall and right click on it and click on the Uninstall as displayed in the screenshot above. Similarly you can uninstall any display language which displays a wizard allowing you to remove any display language you might have installed from your Windows Computer.

The file(s) uninstalled or deleted in any of the un – installation procedure does not go to recycle bin and you must make sure that you do understand what you are doing. In case you are facing any issue with a specific software application and you wish to try re-installing the software, make sure that you do understand whether you are going to install a new compatible version or the same software version again. Many times file(s) created by software applications are not compatible with older versions of the software and removing a working software (with some issue) might cause you bigger problems.

File Locator to Locate Files in Windows Explorer

File Locator to Locate Files in Windows Explorer

In case you have already uninstalled a software application or program and even then you get popup windows from that application, you would need to manually delete the file. Application Programs or Files of any kind in Windows cannot be deleted until they are not in use. In case you uninstalled a software application and the software application was still running in memory having an icon in system tray or minimized in the taskbar, the uninstaller will not be able to delete the application program. In such cases the File Locator can be of help which can locate files in Windows Explorer automatically for you.

Uninstalling a Software of any kind in Windows requires you to have Admin Access and must be done carefully. Just like with other applications in Windows, do remember to read what a window is saying and use Left and Right Mouse Clicks as and when applicable. Also remember the uninstaller does not send files to recycle bin and every uninstaller adds or removes entries to registry which is a complex database supposed to be used only by software applications and Microsoft Windows itself. Always Uninstall Software when you are sure that you do not need that particular software application or you want to make space on your hard disk for other software application. In case you are planning to install software again after uninstalling a particular software, make sure to find out whether new version of the software works the same as currently installed version or are there any changes in the software which might affect your data.