Different Wallpaper for Second Monitor in Windows 8

Windows 8 allows you to have different wallpaper on second monitor. The process of setting up different wallpaper on a Windows 8 computer requires that the second monitor must be enabled in extended mode. Once you have dual or multiple monitors running in Extended Mode, you can set different wallpaper for different monitors on c computer running Windows 8. Have a look at the given below screenshot which displays how your screen resolution display should appear once you have dual monitors running in extended mode.
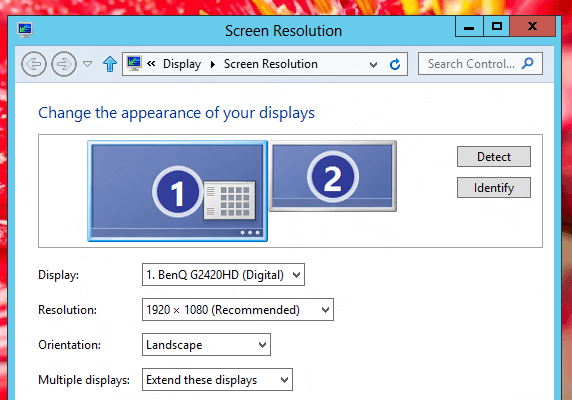
Screen Resolution Settings in Extended Mode for Dual Monitors on Windows 8

Screen Resolution Settings in Extended Mode for Dual Monitors on Windows 8

Once you do have dual or multiple monitors running in Extended Mode as displayed above, you are all set to have different wallpapers on different monitors. Makeup your mind as to which wallpaper you wish to have on your second monitor and open Personalization’s Desktop Background tab and right click on the desired wallpaper to be set as background for the second monitor.
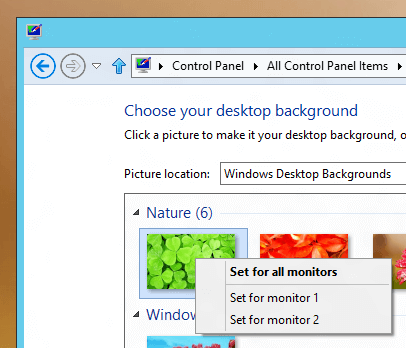
Set Wallpaper for Different Monitors

Set Wallpaper for Second Monitor

Note that the right click menu as displayed for any selected image appears only when you do have dual or multiple monitors up and running in extended mode as displayed in the first screenshot above. You can alternatively use the Dual Monitor Software which allows the same process but with easy selection and lots of other second monitor control and related options.
Manage Stored Passwords in Windows 8

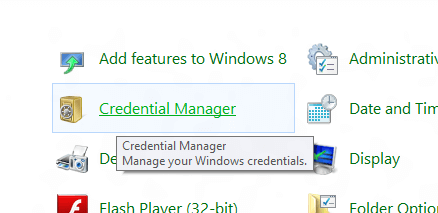
Whether you logon to websites, network locations or any electronic devices connected to your Windows 8 computer which requires password authentication, you must know how to manage your passwords in Windows 8. Yes this information can be really useful in case you forgot password and want to know the password you use to logon to a website or any other network location. Windows 8 makes it easy for you to view , remove or even backup your stored credentials with Windows 8. In order to start with managing credentials, open up Windows 8 Control Panel and click on the Credential Manager icon as displayed in the screenshot below.

Credential Manager in Windows 8 from Control Panel

Credential Manager in Windows 8 from Control Panel

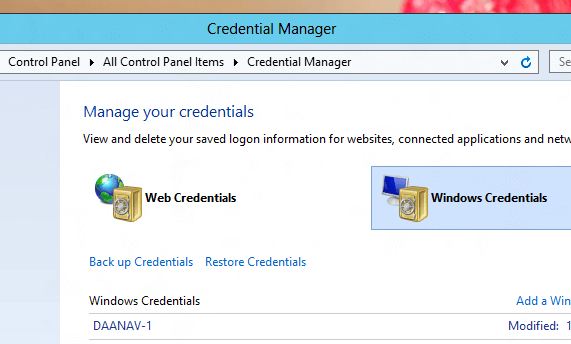
The Windows Credential Manager allows you to manage Web Credentials and Windows Credentials separately. The given below screenshot displays the appearance of Windows Credential Manager with Windows Credentials selected. This is the place where you can know your stored passwords, remove stored passwords to network locations, remote desktop accounts and other network related places. You can even backup your stored users id and password information from the Back up Credentials link which allows you to store the Credentials in a .crd file. The .crd file is a binary file which can be used to restore stored credentials from the Credential Manager.

Windows Credentials in Windows 8

Windows Credentials in Windows 8

Similarly Web Credentials allows you to manage user name and passwords stored. Whenever you visit a website which does not allows you to remember password, this Web Credentials can be really handy. All you need to do is either double click on the user name field or type the first letter of your user name and windows will automatically fill in your user name and password in the authentication fields. Web Credentials allows you to view the website name, user name and password stored. In order to view the password, you would need to authenticate yourself with the password of the signed on user account.

Rename Multiple Files in Windows 8

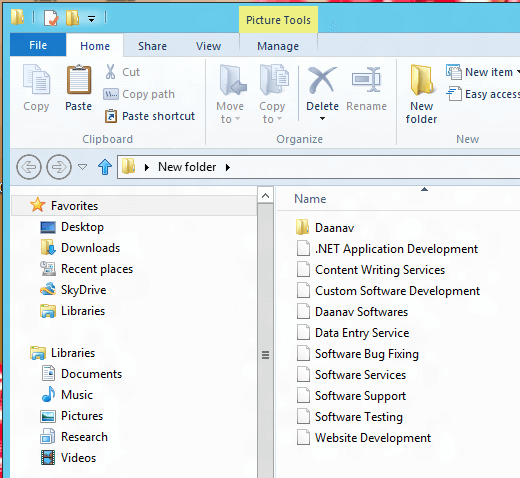
Yes Microsoft is listening to users and has provided new Multiple File Renaming Functionality in Windows 8. You can now easily rename multiple files in a single step. Whether you have downloaded images from your Digital Camera or from any other place, the default file names are sort of cryptic and cannot be remembered. In case you are using Windows 8, you can rename multiple files at once and it is as easy as renaming a single file in any other version of Windows. Microsoft Windows 8, renames files and adds numbers automatically so that you do can manage your image files easily and quickly. Watch a Video Tutorial displaying this new Multiple File Renaming functionality or have a look at the given below screenshots which displays the steps in which multiple files were renamed in Windows 8.

Multiple Files Before Renaming in Windows 8

Multiple Files Before Renaming in Windows 8

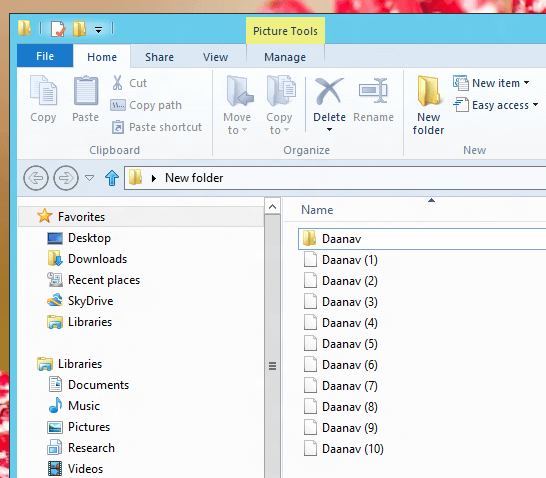
The above screenshot displays a folder in which there are multiple files present on a Windows 8 Computer. The screenshot below displays the file names after renamed by selecting all the files and using the Windows Explorer’s Rename Command (Keyboard Shortcut F2).

Multiple Files After Renaming with Windows 8

Multiple Files After Renaming with Windows 8

New Name for all the files was specified only one and the word Daanav was used to rename all the files. Windows 8 automatically added the numbers and renamed all the files. This way of renaming multiple files in Windows 8 makes Windows 8 more electronic devices friendly. You can even Change File Extension in Windows 8 the easy way. All these new features of Windows 8′s Explorer Application does makes Windows 8 more user friendly and useful.

View or Edit Features of Windows 8

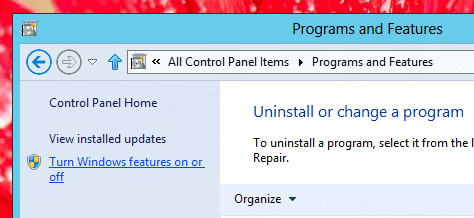
Yes you can view and edit features of Windows 8. The Program and Features of Windows 8 Control Panel provides a quick way to manage installed features of Windows 8. You can install or uninstall various features of Windows 8 like .NET Framework, Hyper-V, Internet Explorer – 10, Internet Information Services and other features of Windows 8. Depending on the version of Windows 8 you have, your computer’s list of features will appear different. You might need the DVD of Windows 8 as well when installing new features to Windows 8. Given below screenshot displays how you can get a list of features of Windows 8 and manage the features.

Turn Windows 8 Feature on or off

Turn Windows 8 Feature on or off

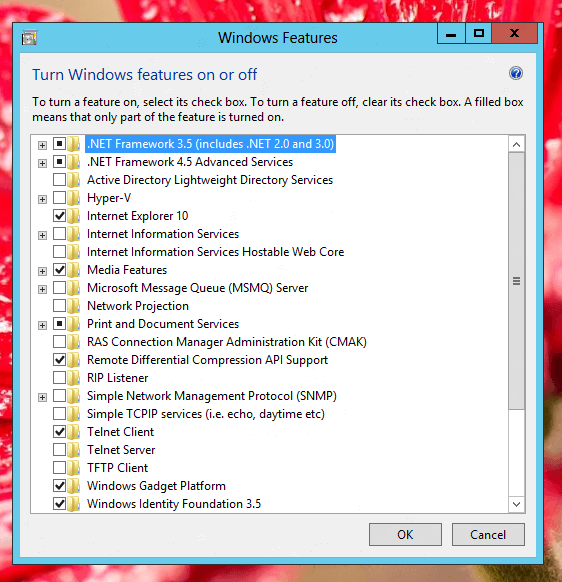
As indicated in the above screenshot, you would need to have admin access in order to change the features. Click on the link that says Turn Windows feature on or off and once you have authenticated yourself, you should be fine to go and within a couple of seconds, you should get a list of Windows 8 features installed.

Install Additional Features of Windows 8

Install Additional Features of Windows 8

As displayed in the above screenshot, there are two versions of .NET installed on this Windows 8 computer which can be removed  by unchecking the check box corresponding to the .NET version. As it depicts from the above screenshot, Internet Explorer 10 has been installed on this Windows 8 computer and can be removed as well.

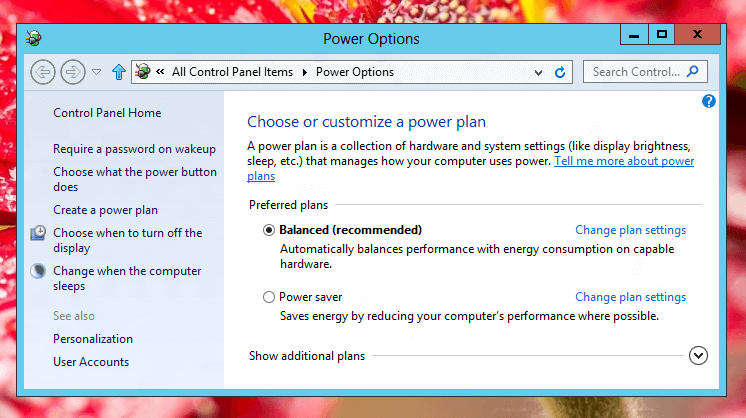
Windows 8 Power Options

Just like other versions of Microsoft Windows, this new version titled Windows 8 does allows you to control your computer’s hardware. There are lots of options available in the Power Options of the Control Panel which together allow you to fully control your Computer’s Hardware. With Windows 8 Power Options, you can control whether or not you want your Display / Monitor to switch to low power state automatically or not. You can control whether your Computer goes to Sleep Mode Automatically after pre-configured duration, etc. Have a look at the given below screenshot of Windows 8 Power Options to get an idea of what options are available to control your computer’s hardware devices like Monitor, Hard Disk, etc.

Windows 8 Power Options

Windows 8 Power Options

The Power Options can be the very first Control Panel Applet you might wish to open after installing Windows 8. By default Windows 8 is configured to Switch the Display to low power mode after pre-configured duration and even to Sleep Automatically after pre-configured inactivity. Irrespective of whether you have installed Windows 8 on a Desktop or Laptop Computer, the Power Options is definitely a unique way to control electricity to various parts of our Computer.

As displayed in the above screenshot, the energy consumption of your Windows 8 computer can be configured by selection or customization of any Power Plan. The Balanced Power Plan is selected in the above screenshot which allows after how much inactive duration does the  Monitor goes to Sleep mode and after what duration of inactivity (no input to the computer in the form of Keyboard Typing, Mouse Movement, etc) must Windows 8 go to Sleep Mode Automatically. You can even select what must happen when the Power Button of your Computer is pressed.