Photo SlideShow Software

The Software presented here is a photo slideshow software for Windows users. With a well designed and user friendly interface, this photo slideshow software provides easy and quick way to add multiple photos to a slideshow and allows to create multiple slideshow files. The Slideshow file does not duplicates the photos added to it to save hard disk space and it just stores a reference to the photos added to the slideshow. Just like a traditional Windows application, you need to remember that this Photo Slideshow software works with Menu, Buttons and Right Clicks. The given below screenshot displays the main screen of the photo slideshow software and later a video tutorial of the slideshow software is also presented.
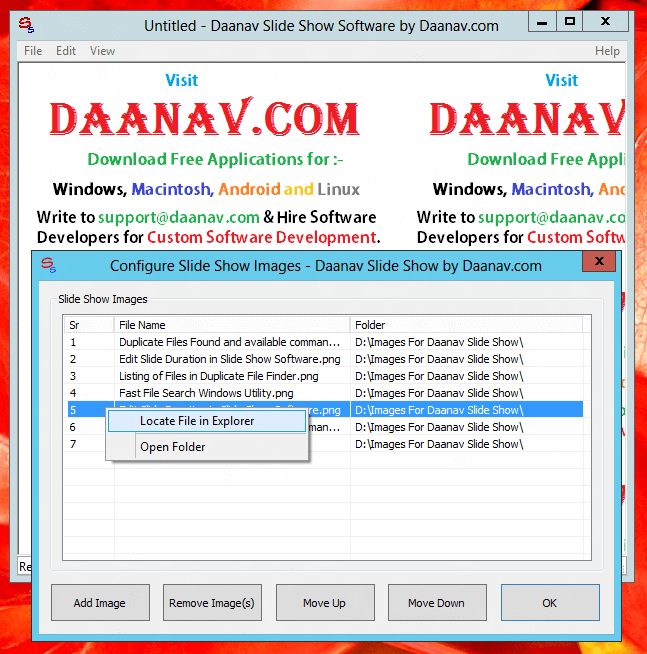
Photo SlideShow Software for Windows

Screenshot of Photo SlideShow Software captured on a Windows 8 Computer

The Above Screenshot Displays how you can add photos to the Photo SlideShow. The best way to quickly add Photographs to the SlideShow is collect all your photographs in a single folder and decide in which order you want the photos to appear in the slideshow. The Photographs will appear at the Center of the SlideShow Software Window, however the background image can be tiled, kept in center or at the top left corner of the software window. Once you have decided in which order the photos should appear in the slide show, add the first photo to the slide show by either dragging the photo from the explorer window to the SlideShow Window or using the Add Button (which opens a file locator to let you select image file). Follow this procedure to add multiple photographs to the slideshow and finally press the OK button to save your changes and close the SlideShow Images window.

This Photo SlideShow Software is really intutive and is easy to use. In case you have already used Windows Applications and are comfortable using Left and Right Clicks, you are good to go and you can create, save and edit slideshows within no time with this Photo SlideShow Software for Windows. You can alternatively Watch Photo SlideShow Video Tutorial in your own video player and learn the software within few minutes. This Video Tutorial was recorded on a Windows 8 Computer and the software works fine on other versions of Windows like Vista, Windows 7, etc.
Connect to Remote Computer with Windows 8

Connecting to a Remote Computer in Network is quite easy with few steps. First of all you need to make sure that the computer to which you wish to connect is on Network and is turned ON. Tests were performed when writing this tutorial on 2 computers running Windows 8 and connected by a Ethernet Switch. Simple Network Connection was used without any workgroup of domain settings. Depending on your Network Connections, you would need appropriate access to connect to the remote computer from Windows 8 or to a Windows 8 Computer.

Network discovery Status on Windows 8

Enable Network Discovery on Windows 8 Computer to Connect to a Remote Computer

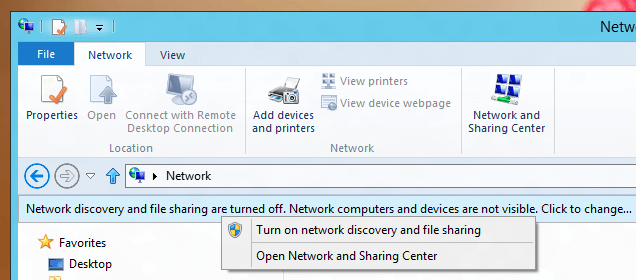
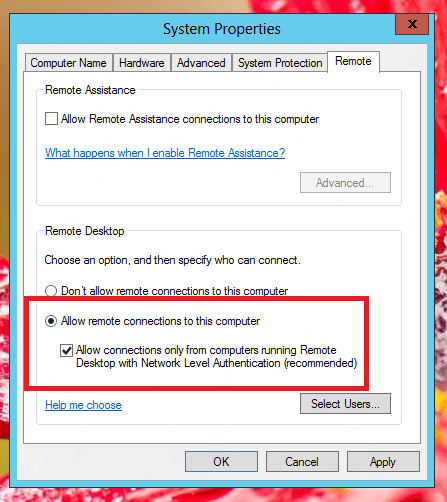
Connecting to a Remote Computer needs Network Discovery enabled on your Computer. Navigate to the Network from Windows Explorer and if required enable Turn On Network Discovery on your Computer. As this test was performed on a Windows 8 Computer, your Windows Explorer will look different if you are connecting from a Windows 7 or Windows Vista Computer. Once your computer can access network information, now you need to make sure that the remote computer allows incoming connections. Go to the Remote Computer, note it’s name (you would need this later to connect to this computer remotely), Open System properties from the Control Panel and enable Incoming Remote Connections as displayed in the screenshot below.

Allow Remote Connections to a Windows 8 Computer

Allow Remote Connections to a Windows 8 Computer

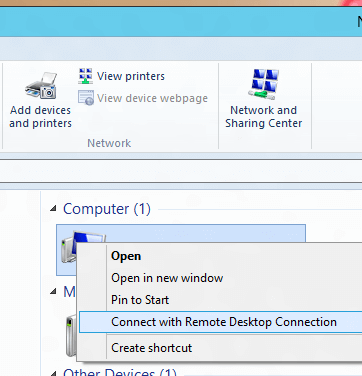
Once you have done and confirmed both the above mentioned steps, all you need now is appropriate access. Make sure that you do have appropriate User Name and Password to connect to Remote Computer. Open your Network from Windows Explorer, locate the remote computer by name and right click on it as displayed on the screenshot below.

Connect to Network Computer from Windows 8 Computer

Connect to Network Computer from Windows 8 Computer

Now your Computer would try to connect to Remote Computer and once connected, it would ask you to enter the user name and password. Yes you will be allowed to store the user name and password so that next time you connect from this computer to the same remote computer you would not need to authenticate yourself. Once connected a full screen view of the remote computer would be launched in your computer’s display resolution.

Mouse Cursor Software for Presentations

This Post presents a Windows Software Utility which can be handy when doing presentations on small, big or projector screens. This Utility allows Windows users to associate a bitmap file with the mouse cursor. The bitmap file is defined within the software and the software allows user to specify a transparent color. It’s really easy to use once you get an idea of what this mouse cursor utility can do for you. In Windows Mouse Cursors can be defined from the control panel, yes you can specify mouse cursors with animations, but size of the mouse cursor is fixed and cannot be increased.

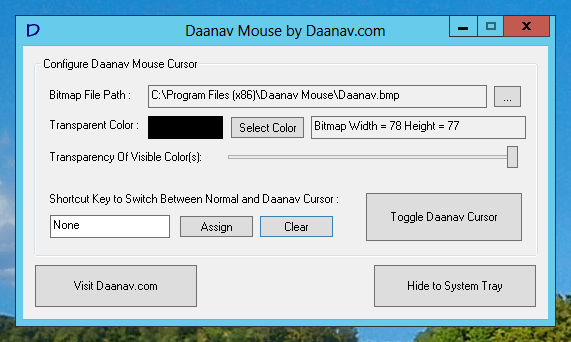
Mouse Cursor Software for Windows

Mouse Cursor Software for Windows

This Mouse Cursor Software allows you to have any size of Mouse Cursor. This Application does not changes Mouse Cursor in Control Panel and you can still change your mouse cursor from the control panel settings. This Mouse Cursor Software makes a bitmap follow your mouse cursor. Now the size of the bitmap following your mouse cursor is defined by the actual bitmap size and you are free to design your own mouse cursor in a .bmp file. Have a look at the above screenshot or Watch this Mouse Cursor Software in a Video Tutorial. The Video Displays How you can Switch from Normal Mouse Cursor to Daanav Mouse Cursor using Toggle Daanav Cursor Button and with a Keyboard Shortcut. This Video also displays how to close the big mouse cursor in case you make transparency color selection so that the mouse cursor cannot click.

Yes this Windows Mouse Cursor Software works fine on Windows 8, Windows 7 and other versions of Microsoft Windows. As this Application does not changes your actual Mouse Cursor, you can have both cursors as you want to have. In order to make changes to the actual mouse cursor, do the changes from Control Panel and in order to change the cursor defined by this Mouse Cursor Application, create a .bmp file with appropriate transparency settings, select the .bmp file in the Daanav Mouse Software and have your own Big Arrow Cursor, or anything else depending on how creative you are and how you design the bitmap file.

How to Install Windows 8 on Virtual Computer

Wanna try out Windows 8 on a virtual computer without making dual boot or looking for another website ? Yes now you can install Windows 8 on a Virtual Computer and check out all the features of Windows 8 from within virtual machine itself. Oracle supplies a brilliant software by the name VM VirtualBox which is a really great software and allows you to install Windows 8 , Windows 7 or almost any other Operating System in a file. Yes you read it correct, the complete operating system goes into a single file and the VirtualBox manages the data of the file and you can run multiple operating systems on your computer.

There are hardware constraints in running Virtual Computer and in case your computer can fulfill that, you are good to go and you can start running Windows 8 in a Virtual Computer. Hardware Virtualization is a feature supported by processor and motherboard which Virtual Computer Software Applications use to use computer hardware and do various operations. Amount of Memory Installed on your Computer also is a constraint and the more the better. Running Windows 8 on a Virtual Computer effectively means that you are running two operating systems and ofcourse, your computer hardware must be sophisticated enough so that your motherboard, processor, ram and other hardware components can work together to give you a great experience.

In case your Computer does not supports Hardware Virtualization or does not have enough memory to run two or more operating system, better look for alternative options like making your hard disk dual boot or even get a new hard disk for testing of Windows 8. Once your Computer Hardware is good enough to run multiple operating systems, Download Windows 8 from Microsoft website and go for 32 bit version iso download which is smaller in size as compared to 64 bit version and will run fine.

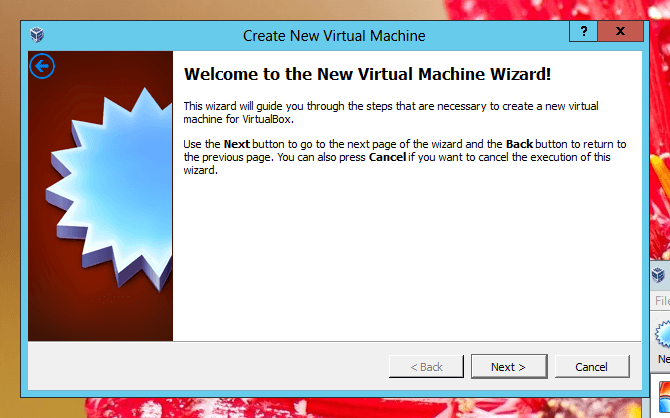
Create New Virtual Machine to Install Windows 8

Create New Virtual Machine to Install Windows 8

Once you have the .iso file of 32 bit Windows 8, start the Oracle VM VirtualBox and click on the Create New Virtual Machine button and then follow onscreen prompts. The Wizard will ask you parameters of your new virtual computer like memory size, hard disk space, etc. Just follow onscreen prompts and when the wizard has been completed, start the newly created virtual computer and then it will prompt you to locate the iso file of the Windows 8. Tell the Virtual Machine about the location of Windows 8′s iso file and just follow onscreen prompts and you will have newly installed Windows 8 running in Virtual Machine within few minutes.

Shutdown Windows 8 Without Mouse

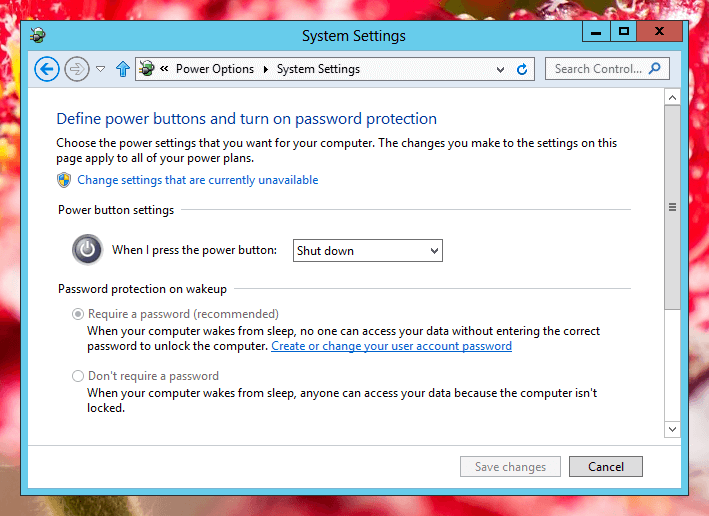
Whether you Mouse Cursor is not working or you prefer keyboard to Shutdown Windows 8, now you can shutdown Windows 8 Computer without using a Mouse. There are multiple ways by which you can shutdown Windows 8 Computer without Mouse. The very first way to shutdown a Windows 8 computer without Keyboard & Mouse is press the Power button on the CPU. What happens on pressing the power button on Windows Computers can be controlled using the System Settings of the Control Panel as displayed below. Pressing the Power Button on Windows 8 to Shutdown the Computer will initiate a brute or fast shutdown and will ignore any unsaved changes in any open documents and applications.

Control Power Button Press on a Windows 8 Computer

Control Power Button Press on a Windows 8 Computer

Another way to shutdown Windows 8 Computer without using Mouse is to use Keyboard to Shutdown Windows 8. You do not need any software utility to Shutdown Windows 8 and you can simply use Keyboard Shortcuts of Windows 8 and take care of your Documents and Applications before shutting down a Windows 8 Computer. The Magic Keyboard Shortcut is Alt + F4 to Shutdown a Windows 8 Computer without using Mouse Cursor.

Shutdown Windows 8 Computer without Mouse

Shutdown Windows 8 Computer without Mouse

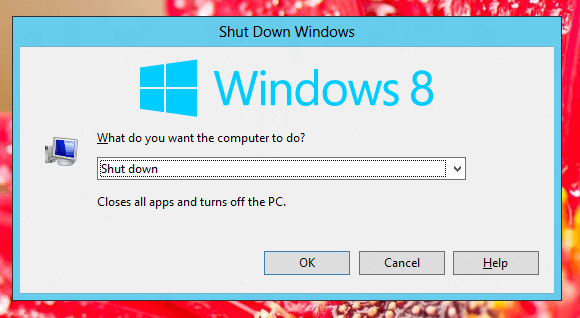
Alt + F4 in Windows 8 is designed to close any active application. Yes pressing Alt + F4 allows you to save any unsaved data in documents and hence is as good as clicking on the close button on any given Windows Application. This Alt + F4 Keyboard Shortcut can be used to Close a Desktop Application, this Keyboard Shortcut can be used to close a Windows 8 style application and even to shutdown the Windows 8 Computer. When you have closed all the applications, and are on the Desktop, the focus automatically moves to the Desktop Window on which if you press Alt + F4, the Shutdown Windows screen will appear allowing you to shutdown windows 8 without using mouse cursor.

In case you are struck at the Login Screen and want to Shutdown or Restart Computer, press Tab Key to navigate to the bottom right corner icon and press Enter to invoke a Menu where you can select either to Shutdown or Restart Computer without using a Mouse.  This method is similar to the method described in the post Control Panel without Mouse and works fine.